


This article explains how to build a simple Go library for the Ds18b20 temperature sensor without using any external repositories besides Go built-in libraries.
Project components
This small project comprises:
Devices and components:
- Ds18b20 temperature sensor (more details: https://bit.ly/3IWEhn0 )
- 4.7k Ohm resistor
- Raspberry Pi 2B (should also work fine with other versions)
Languages:
- Go (basic level)
- Bash (basic level)
System:
- Linux (Raspberry OS)
Other:
- GitHub account for publishing the library
Does Go language fit the Raspberry Pi?
Writing programs in Go to run them on Raspberry Pi might sound exotic, but the growing number of different Go libraries on GitHub dedicated to Raspberry Pi proves that the language works with Raspberry devices and people are interested in using it.
It is not as popular as Python though. GitHub shows that the number of Go based libraries makes up only 10% of the Python based libraries for the Raspberry Pi platform.
You may ask if it is worth using Go for writing programs to run on Raspberry Pi devices.
It is reasonable to use it for your projects because of the following reasons:
- Go has a small memory footprint in comparison to Python because the Go code is compiled to a binary file that can be run by the raspberry pi machine natively.
For contrast, running Python scripts on the machine actually runs the additional interpreter which uses more memory to translate the Python code to the machine native language in the runtime.
The whole translation of Go code and optimisation is done when you compile your Go program. It is a huge benefit due to a small amount of built-in memory in older Raspberry devices. - The fact that the Go program can be compiled to the machine’s native language means that the program will be faster in comparison to programs run by interpreters.
- Go language enables you to run concurrent programs at the same time
while Python does not support it. - The huge benefit of using Go is the type safety check and the automatic code formatting during builds.
The code is unified and verified before it is compiled.
The Go compiler informs programmers when an assertion or a syntax error has occurred in the codebase. - The most popular interfaces and sensors for Raspberry Pi already have Go libraries supporting them.
The base on which programmers can build their own programs is already wide and is still growing.
Step 1: Configure Raspberry Pi to communicate with the sensor
The Ds18b20 sensor uses 1-wire communication protocol to exchange information with the Raspberry Pi device.
The sensor needs to be connected to the 1-wire GPIO pin of the Raspberry Pi device.
Under this link, you can verify which pin supports a 1-wire connection for the device of your choice: https://pinout.xyz/pinout/1_wire
By default, GPIO 4 is the 1-wire port.
To enable the default port, follow the steps listed below.
Enabling 1-wire port can be done in 2 ways:
Step 1.1:
Solution 1:
Enabling 1-wire using the raspi-config interface. Type in the terminal:
sudo raspi-config
In the open program select the interfaces option, find 1-wire option, and select enable as shown below.


Solution 2 – alternative 1:
Alternatively, edit the /boot/config.txt file and add or uncomment the line as listed below:
sudo nano /boot/config.txt
Add or uncomment the following line:
dtoverlay=w1-gpio
Solution 2 – alternative 2:
Alternatively, if you want to use a different GPIO pin than GPIO4, you can add the following line in the /boot/config.txt file. In this case, GPIO 21 is my custom 1-wire pin.
dtoverlay=w1-gpio,gpiopin=21
Step 1.2:
Set the pull-up option for the pin and then restart the configuration using these commands (remember to change the PIN_NUMBER to the number that you chose – default: 4, in my case 21).
Type these commands in the terminal:
sudo dtoverlay w1-gpio gpiopin=PIN_NUMBER pullup=0
sudo modprobe w1-gpio
Step 2: Connect the temperature sensor to your Raspberry
Connect the temperature sensor as presented in the picture below.
Remember to use the correct resistor – 4.7k Ohm. The resistance is shown by the colours on the resistor. Remember to connect the data wire to the pin that you have chosen as your 1-wire pin in the configuration during step 1.
In the following example, the data pin is GPIO 21. You can connect the data pin to the GPIO4 by default or use another customised GPIO pin that you have chosen in step 1.

Step 3: Verify the configuration and connection
Now, when the sensor is connected and Raspberry Pi is configured, you can check if the sensor is visible on the Raspberry. Type in the terminal of your Raspberry:
ls /sys/bus/w1/devices/
You should see a list of files that represents the connected sensors. The temperature sensor will be visible as a file with an address similar to 28-01195240e3ff.
The example of an output from the command:
pi@raspberrypi: $ ls /sys/bus/w1/devices/
28-01195240e3ff w1_bus_master1
The file name represents the address of your temperature sensor.
The sensor address is important, so ensure to copy it for later use.
You can use less to display the file content:
less /sys/bus/w1/devices/28-01195240e3ff/w1_slave
Or using cat:
cat /sys/bus/w1/devices/28-01195240e3ff/w1_slave
If you have set up the sensor and pin correctly, you should see a similar output:

t=21312 is the temperature with 3 decimal places in Celsius degrees (21.3*C).
Step 4: Create an empty repository and push it to GitHub
Start from creating a directory on your computer (it is not needed to be on the Raspberry because we will compile the Go program to binary and upload the binary to the Raspberry Pi). Let’s name the directory ds18b20-go.
Open the directory. Add an empty file called main.go in this directory.
To create and publish the library, you need to have git installed.
Next, initialise the git repository. You can do all of these things in the terminal as follows:
mkdir ds18b20-go
cd ds18b20-go
touch main.go
git init
git add .
git commit -m “init repository”
After those steps, you can create a GitHub repository which will be hosting your golang library.
Login to GitHub, create a public repository.

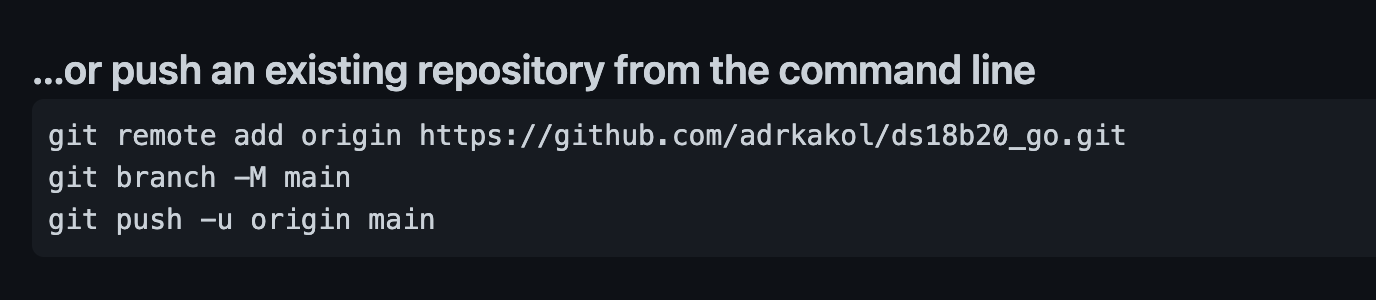
After creating the repository, you will be asked to push the code into it. Do this by following the instructions provided on the GitHub page:
You will be asked to provide the username and password to your GitHub account.
After these steps, you will see the pushed changes in your repository.
Step 5: Let’s start coding!
Open the main.go in the ds18b20-go directory that has been created in the previous step.
If you are new to Go language, please notice that when the variable or method is named with an upper case letter,
it means that the method or variable is public and can be used outside of the module (package).
Lower case letter names are only visible in the scope of the package in which the name is defined.
Module and imports:
Firstly, we have to name the module. Add the first line of code:
package DS18B20
Secondly, import the required dependencies.
We need os, regexp and bufio for reading files, errors for returning errors gracefully, math and strconv to round and parse the temperature.
import (
	"bufio"
	"errors"
	"math"
	"os"
	"regexp"
	"strconv"
	"strings"
)
Sensor struct:
Now, let’s define the structure of our temperature sensor called DS18B20.
This struct stores the address of the device and the path to the file.
Notice that the address and filePath are private variables that are only used for internal operations that are only accessible in the package scope.
type DS18B20 struct {
	address  string
	filePath string
}
It is time to write the first function. This function is a public interface that enables you to initialise the instance of our temperature sensor struct.
As a result, it returns the new instance of the sensor. As a parameter, the programmer needs to pass an address of the sensor for his raspberry device.
We will add the method privately setSensorFilePath in the next step.
func Init(address string) *DS18B20 {
	ds := new(DS18B20)
	ds.address = address
	ds.setSensorFilePath()

	return ds
}
Sensor struct methods:
Now, we have to add a private method, which will prepare a filePath during the sensor struct initialisation.
We will use the *DS18B20 parameter type in this function to let Go know that this is a method added to the struct so it can be called on the sensor instance, for example sensor.setSensorFilePath().
This method combines the given address with the standard raspberry pi path to the file from which the measured temperature is accessible.
func (ds *DS18B20) setSensorFilePath() {
	ds.filePath = "/sys/bus/w1/devices/" + ds.address + "/w1_slave"
}
Now, when we have the file path, we can start reading the temperature from the file.
Let’s add a new method to the DS18B20 struct.
This method uses the next getTemperatureFromFile() method that opens the file and reads a temperature from it.
Next, it tries to parse the temperature and, if parsing has failed, it returns an error.
If everything is fine, it returns a temperature as a float.
Method checks if the length of the temperature string is at least 3 characters long, and if converting string to float does not return an error.
func (ds *DS18B20) GetTemperature() (float64, error) {
	temperature, err := ds.getTemperatureFromFile()

	if err != nil {
		return 0, err
	}

	var comaIndex int = len(temperature) - 3
	var temperatureFixed string = temperature[:comaIndex] + "." + temperature[comaIndex:]

	parsed, err := strconv.ParseFloat(temperatureFixed, 64)

	if err != nil {
		return 0, errors.New("Unable to parse temperature.")
	}

	return math.Round(parsed*100) / 100, nil
}
Temperature reader function:
Last, we need to define the getTemperatureFromFile and implement the logic of reading the temperature from the file step by step.
func (ds *DS18B20) getTemperatureFromFile() (string, error) {
}
Firstly, we have to open the file. Add the following lines to the getTemperatureFromFile method. Notice that, in case of an error, we want to close the file using defer file.Close().
    var measuredTemperature string

	file, err := os.Open(ds.filePath)

	if err != nil {
		return "", errors.New("Failed to read the temperature. Cannot open the file.")
	}
	defer file.Close()
Secondly, create a scanner and read the file line by line. Try to find a temperature string in each line using regexp.
The temperature is, for example, in the format t=20.000. “t=.*” is the matcher for it. If the temperature was found, remove t= from it and write it into the measuredTemperature variable.
	scanner := bufio.NewScanner(file)

	for scanner.Scan() {
		var line string = scanner.Text()

		re := regexp.MustCompile("t=.*")
		var temperature string = re.FindString(line)

		if len(temperature) > 0 {
			measuredTemperature = strings.Split(temperature, "=")[1]
		}
	}
The last thing to do is to check if the temperature was read correctly. If it was ok, the method returns it.
If an error occurred in the scanner or the temperature is an empty string, it will return an error.
	if err := scanner.Err(); err != nil {
		return "", errors.New("Failed to read the temperature. Cannot read the file.")
	}

	if len(measuredTemperature) < 1 {
		return "", errors.New("Failed to read the temperature. Cannot parse the file.")
	}
	return measuredTemperature, nil
This is how the file main.go looks after all of the changes:
package DS18B20

import (
	"bufio"
	"errors"
	"math"
	"os"
	"regexp"
	"strconv"
	"strings"
)

type DS18B20 struct {
	address  string
	filePath string
}

func Init(address string) *DS18B20 {
	ds := new(DS18B20)
	ds.address = address
	ds.setSensorFilePath()

	return ds
}

func (ds *DS18B20) setSensorFilePath() {
	ds.filePath = "/sys/bus/w1/devices/" + ds.address + "/w1_slave"
}

func (ds *DS18B20) GetTemperature() (float64, error) {
	temperature, err := ds.getTemperatureFromFile()

	if err != nil {
		return 0, err
	}

	var comaIndex int = len(temperature) - 3
	var temperatureFixed string = temperature[:comaIndex] + "." + temperature[comaIndex:]

	parsed, err := strconv.ParseFloat(temperatureFixed, 64)

	if err != nil {
		return 0, errors.New("Unable to parse temperature.")
	}

	return math.Round(parsed*100) / 100, nil
}

func (ds *DS18B20) getTemperatureFromFile() (string, error) {
	var measuredTemperature string

	file, err := os.Open(ds.filePath)

	if err != nil {
		return "", errors.New("Failed to read the temperature. Cannot open the file.")
	}
	defer file.Close()

	scanner := bufio.NewScanner(file)

	for scanner.Scan() {
		var line string = scanner.Text()

		re := regexp.MustCompile("t=.*")
		var temperature string = re.FindString(line)

		if len(temperature) > 0 {
			measuredTemperature = strings.Split(temperature, "=")[1]
		}
	}

	if err := scanner.Err(); err != nil {
		return "", errors.New("Failed to read the temperature. Cannot read the file.")
	}

	if len(measuredTemperature) < 1 {
		return "", errors.New("Failed to read the temperature. Cannot parse the file.")
	}

	return measuredTemperature, nil
}
Step 6: Initialise the go modules and build the project
In order to properly set up the project as a library, we need to define the mod.go file. To do so, let’s use go lang built in cli.
Use this command to initialise the go.mod file. Change <your username> to the actual name that you use in GitHub.
go init github.com/<your user name>/ds18b20-go
This results in a new file go.mod created in your project directory. This file should look similar to this:
module github.com/adrkakol/ds18b20_go
go 1.15
Now, you should be able to build this project. You can try to build it using this command:
go build -o ds18b20
As a result, you should see a new file called ds18b20 created. You can’t yet test if it works.
Step 7: Tag and push changes to GitHub
Now, let’s tag the current version of the codebase and push it to the remote repository on GitHub:
git add .
git commit -m “feat(get-temperature): create temperature reader”
git push origin master
git tag -a v0.1.0 -m “version 0.1.0”
git push origin —tags
After these steps you can use your library in other repository.
Step 8. Finally, use the library in another Go project
New repository:
As an example, create another directory, and in that directory, create the main.go file. Initialise the Go modules as well:
mkdir test_project
cd test_project
go mod init your-test-repository-name
Add your version of the created library as a dependency (change <your_user_name> and<your_library_name>):
go mod edit -require github.com/<your_user_name>/<your_library_name>@v0.0.1
Add the following code to main.go
package main

import (
	"fmt"
	dsSensor "github.com/<your_user_name>/<your_library_name>"
)

func main() {
	sensorAddress := "YOUR_SENSOR_ADDRESS"
	sensor := dsSensor.Init(sensorAddress)
	temp, err := sensor.GetTemperature()
	if err != nil {
		fmt.Print(err)
		return
	}
	fmt.Printf("\nTemperature: %f \n", temp)
	return
}
Change YOUR_SENSOR_ADDRESS to the actual address which you have obtained in step 3 during the configuration verification.
Installing dependencies:
Now, you have to install the remote modules. To install them, run them in the console:
go get
After these steps, the two files go.mod and go.sum should be created. The file go.mod will be similar to this:
module your-test-repository-name
go 1.15
require github.com/adrkakol/ds18b20-go v0.1.0
Compiling:
Now, you can compile your repository in order to use it on the raspberry.
Go allows you to compile programs for different machines. For raspberry PI, you need to use a proper configuration.
Run the following command to build the repo:
GOOS=linux GOARCH=arm CC_FOR_TARGET=arm-linux-gnueabi-gcc go build -o measure-temperature
After that, copy the program file to your raspberry and run this command to make the file executable:
chmod +x ./measure-temperature
Exporting program to the Raspberry device:
In order to copy the file from your computer to the raspberry pi, you can move it via pendrive or using scp (copying files via ssh) as follows (change <directory_in_the_home_directory> to your own directory name inside the home directory):
scp measure-temperature pi@raspberrypi.local:~/<directory_in_the_home_directory>
For example, I have the dev directory inside the home directory:
scp measure-temperature pi@raspberrypi.local:~/dev
Now, you can run the program in the Raspberry Pi terminal.
Perform these steps:
chmod +x ./measure-temperature


./path/to/file/program/measure-temperature
As a result, you should see a print to the console with the current temperature read from the sensor.

Temperature displayed as a result of the program output
Congratulations if you have reached the end of this article.
I have just helped you create your first library for Raspberry Pi!
In the next article, I will present how to run this program automatically when Raspberry Pi is turned on.
In that way, we will be able to collect the temperature measurements in the database or display it on the LCD screen.
You can find the library I published here:
https://github.com/adrkakol/ds18b20-go/