


Part 1: REALM MOBILE PLATFORM: OFFLINE-FIRST TASKMANAGER APP – INTRO
Part 2: REALM MOBILE PLATFORM: OFFLINE-FIRST TASKMANAGER APP – BASICS OF REALM
Part 4: REALM MOBILE PLATFORM: OFFLINE-FIRST TASKMANAGER APP – AUTHENTICATION
Part 5: Coming soon!
Creating Ubuntu 16.04 Amazon EC2 instance
1. For start go to the AWS website and register a new account (Sign in to the console). Note that you will have to register your credit card, so remember to terminate your Ubuntu machine after finishing this article or else you will be charged for it!


2. Fill out few forms, and once your new account is created, go to the console Services -> Compute -> EC2 option

3. Click on the Launch Instance button

4. Select Ubuntu 16.04 from AWS Marketplace and follow the next steps (especially, the part with generating and downloading a new public-private key pair)


5. Ubuntu instance is now set and ready. You can find it by visiting Running Instances option in your console
Connecting to the machine
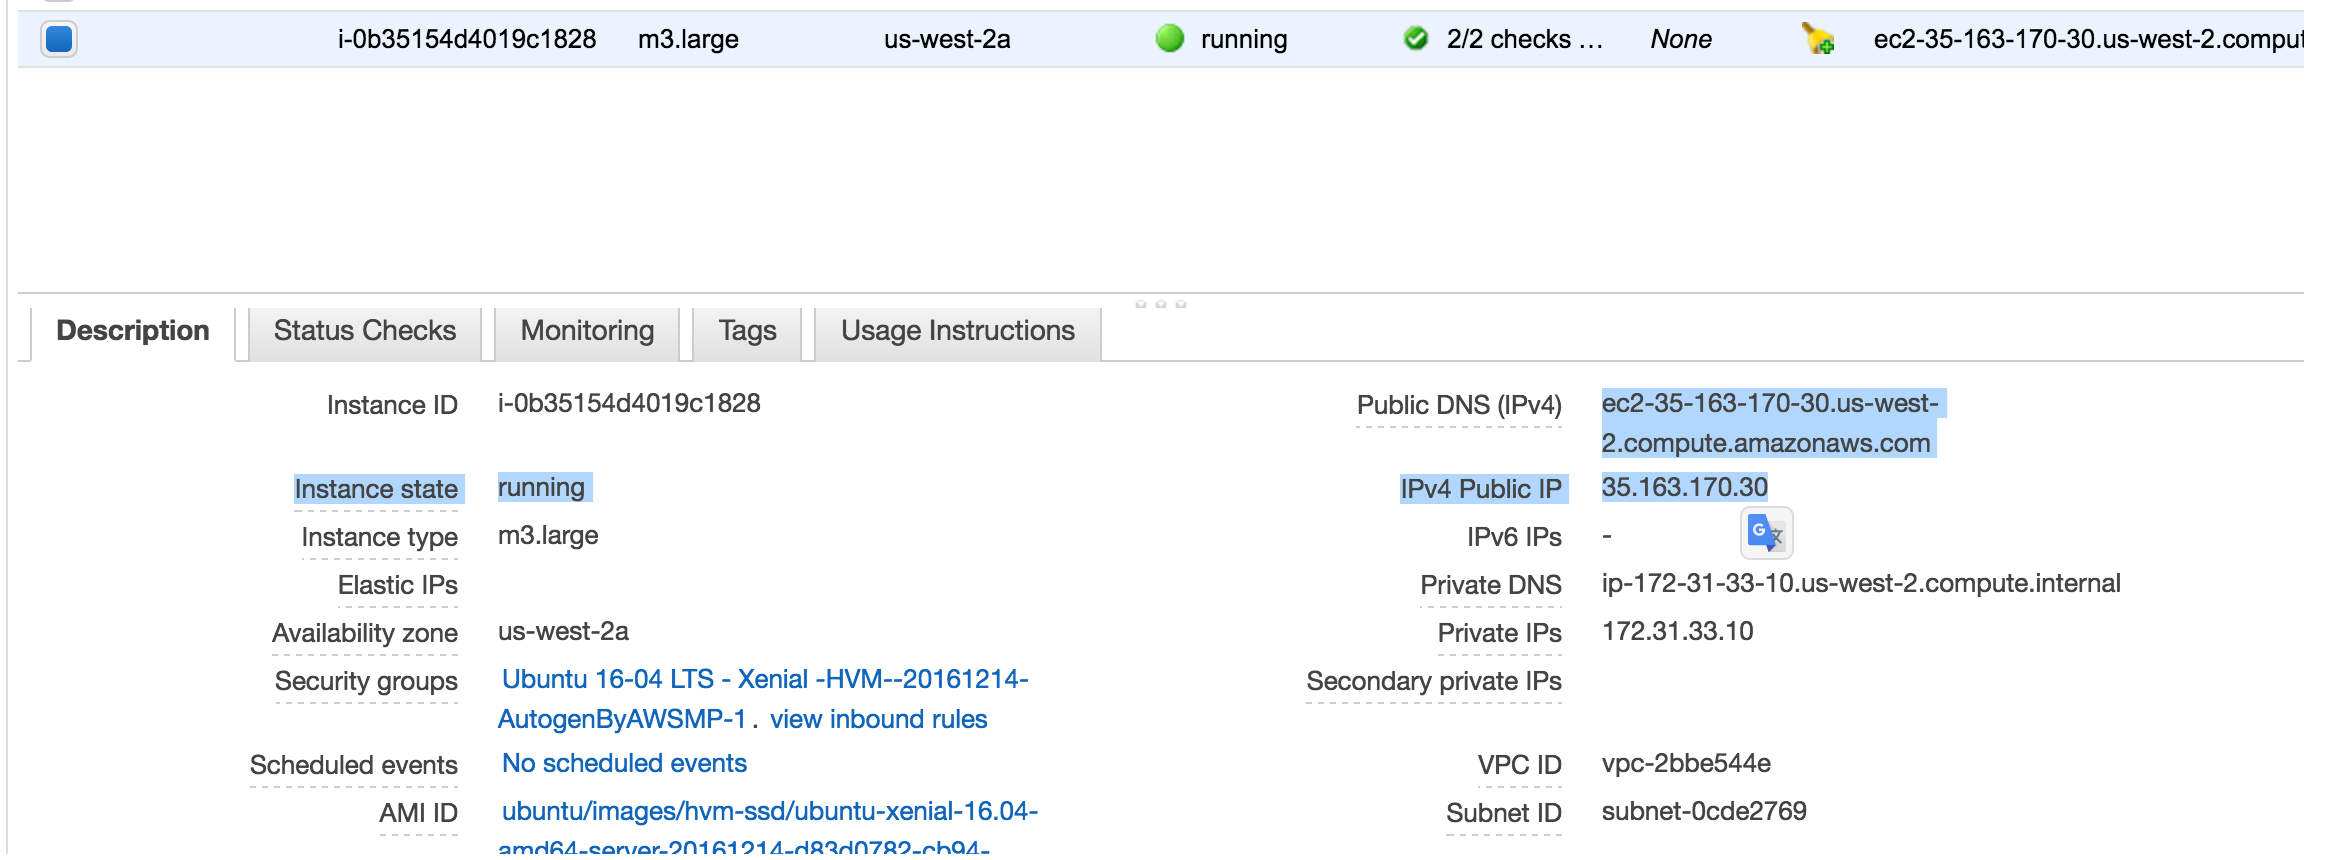
In this step, we are going to connect to our instance through terminal. To do that, you will need three things.
- File with the downloaded private key
- Your Public DNS (IPv4) – you can find it in the description of the created instance (ec2-35-163-170-30.us-west-2.compute.amazonaws.com in my case)
- IPv4 Public IP – also visible in the description (35.163.170.30)

And…. access denied.
Permissions 0644 for ‘./aws-tutorial.pem’ are too open.
It is required that your private key files are NOT accessible by others.
This private key will be ignored.
Load key “./aws-tutorial.pem”: bad permissions
Permission denied (publickey).
It’s very important that the aws-tutorial.pem file is not writable by just anybody, so we have to change its permissions.

Now after retrying the ssh command we will get connected, and ready to rock the world!

Installing Realm Object Server
Installation of our backend is really straightforward. You just need to connect to your machine (with ssh) and then invoke the following commands:
1. Setup Realm’s package repository
curl -s https://packagecloud.io/install/repositories/realm/realm/script.deb.sh | sudo bash

2. Update repositories
sudo apt-get update

3. Install the Realm Object Server
sudo apt-get install realm-object-server-developer

4. Enable and start the service
sudo systemctl enable realm-object-server
sudo systemctl start realm-object-server

Our dashboard will be accessible under this address http://[your ip]:9080, however, we have one more thing to do in order to make it happen. We need to enable 9080 port. To achieve this you need to choose NETWORK & SECURITY/Security Groups option (left menu), create a new security group and open the required ports through the Edit inbound rules option.

Ports configuration

As the last step, go back to the Instances screen, select Actions/Networking/Change Security Group on your Ubuntu instance and apply created security group.
And voila! Now you are able to access Realm Object Server dashboard through the address that I have mentioned earlier.

Realm Object Server configuration
The server configuration is placed in the file /etc/realm/configuration.yml and it has 3 mandatory settings
- storage.root_path: /var/lib/realm/object-server – directory which is going to contain our realms
- auth.public_key_path: /etc/realm/token-signature.pub – public key path for clients’ authentication
- auth.private_key_path: /etc/realm/token-signature.key – private key path for clients’ authentication
There are few other options which are discussed in the last part of the series:
- Address/Port the service responsible for syncing should bind to
- Address/Port the http service should bind to
- Proxy configuration (you can enable here https, which disabled by default)
- Logging configuration (by default logs end up in /var/log/realm-object-server.log directory)
Browsing Realm Object Server on macOS
For macOS users it is possible to observe and edit the realms with Realm Browser software available in AppStore
After getting the needed software (it’s free), you can connect to the server by providing its ip address and login credentials of the admin user you created.

However, since we didn’t finish our app yet, you will only see default realm files on the server.

Thanks for reading! The 4th part of the series is now available!
Part 4: REALM MOBILE PLATFORM: OFFLINE-FIRST TASKMANAGER APP – AUTHENTICATION