


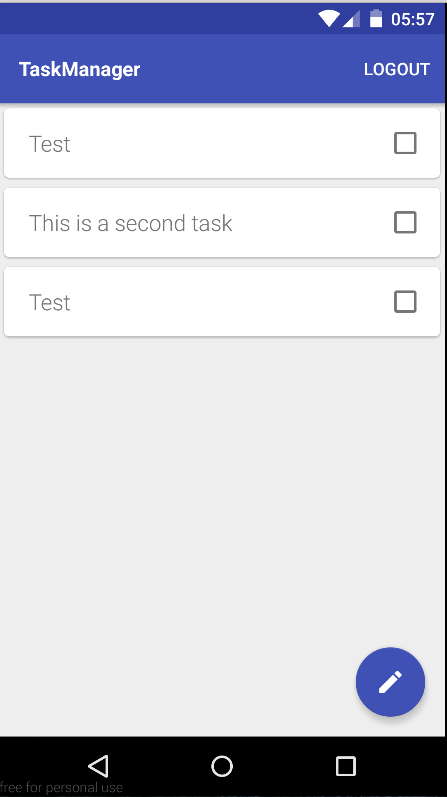
Here is the preview of the app that we are going to develop during the series.

1. Technology stack
Realm Mobile Platform
A flexible platform for creating offline-first, reactive mobile apps effortlessly.
This platform integrates two technologies we are going to use:
Realm Object Server
Realm Object Server (released around September 2016) is basically a backend responsible for realtime data synchronization, resolving conflicts in data changes, handling various events and authentication. In can be deployed on servers or in the cloud.
Realm Mobile Database
Realm Mobile Database is a cross-platform database, supporting both iOS and Android and it’s open source. For those who are familiar with SQLite database (default choice of persistence in Android) or ORM libraries like ORMLite/ActiveAndroid/GreenDao, you should know that in Realm gives no SQLite at all. Realm Mobile Database is a Zero-copy object store. Sounds familiar? Probably not (I had not known that before attending the Droidcon NYC 2015 – Realm: Building a mobile database).
In this article we are going to use the Developer Edition of RPM.
Ubuntu 16.04. hosted on Amazon EC2
The instance of our Realm Object Server backend will be available through the Ubuntu instance.
2. Useful links
- Realm.io
- Realm on GitHub
- Realm documentation
- Droidcon NYC 2015 – Realm: Building a mobile database
- A Look Inside Realm’s Core DB Engine
3. TaskManager UI
Before getting to the “cool” stuff, we are going to prepare some basic UI for the app. However, if you are impatient (like I am), you can just checkout to commit 09adf4d in the TaskManager github repository and start from there.
3.1 Gradle
Core dependencies for UI.
compile 'com.android.support:appcompat-v7:25.0.1'
compile "com.android.support:support-annotations:25.0.1"
compile "com.android.support:support-v13:25.0.1"
compile "com.android.support:design:25.0.1"
compile "com.android.support:recyclerview-v7:25.0.1"
compile "com.android.support:cardview-v7:25.0.1"
compile "com.jakewharton:butterknife:7.0.1"
compile 'com.gordonwong:material-sheet-fab:1.2.1' //Library containing the fab button
3.2 Main screen UI
activity_main.xml
<?xml version="1.0" encoding="utf-8"?>
<RelativeLayout xmlns:android="http://schemas.android.com/apk/res/android"
    xmlns:app="http://schemas.android.com/apk/res-auto"
    android:layout_width="match_parent"
    android:layout_height="match_parent"
    android:orientation="vertical">

    <android.support.design.widget.CoordinatorLayout
        android:id="@+id/coordinator_layout"
        android:layout_width="match_parent"
        android:layout_height="match_parent"
        android:orientation="vertical">

        <FrameLayout
            android:layout_width="match_parent"
            android:layout_height="match_parent"
            app:layout_behavior="@string/appbar_scrolling_view_behavior">

            <android.support.v7.widget.RecyclerView
                android:id="@+id/recycler"
                android:layout_width="match_parent"
                android:layout_height="match_parent" />

        </FrameLayout>

        <include layout="@layout/toolbar" />

        <include layout="@layout/fab" />

    </android.support.design.widget.CoordinatorLayout>

    <include layout="@layout/sheet" />

</RelativeLayout>
toolbar.xml
Basic toolbar with a title.
<?xml version="1.0" encoding="utf-8"?>
<merge xmlns:android="http://schemas.android.com/apk/res/android"
    xmlns:app="http://schemas.android.com/apk/res-auto"
    android:orientation="vertical"
    android:layout_width="match_parent"
    android:layout_height="match_parent">

    <android.support.design.widget.AppBarLayout
        android:id="@+id/appBarLayout"
        android:layout_width="match_parent"
        android:layout_height="wrap_content"
        android:background="@android:color/transparent"
        android:theme="@style/ThemeOverlay.AppCompat.Dark.ActionBar">

        <android.support.v7.widget.Toolbar
            android:id="@+id/toolbar"
            android:layout_width="match_parent"
            android:layout_height="?attr/actionBarSize"
            android:background="@color/colorPrimary"
            app:layout_collapseMode="pin"
            app:layout_scrollFlags="scroll|enterAlways"
            app:theme="@style/ThemeOverlay.AppCompat.Dark.ActionBar">

            <FrameLayout
                android:layout_width="match_parent"
                android:layout_height="wrap_content">

                <TextView
                    android:id="@+id/title"
                    android:text="TaskManager"
                    android:layout_width="match_parent"
                    android:layout_height="wrap_content"
                    android:textColor="#fff"
                    android:textStyle="bold"
                    android:textSize="16sp"
                    android:singleLine="true" />


            </FrameLayout>
        </android.support.v7.widget.Toolbar>
    </android.support.design.widget.AppBarLayout>
</merge>
fab.xml
Custom implementation of fab button (copied from this sample)
<?xml version="1.0" encoding="utf-8"?>
<merge xmlns:android="http://schemas.android.com/apk/res/android"
    xmlns:app="http://schemas.android.com/apk/res-auto">

    <pl.adriankremski.realmtaskmanager.views.Fab
        android:id="@+id/fab"
        android:layout_width="wrap_content"
        android:layout_height="wrap_content"
        android:layout_margin="16dp"
        android:clickable="true"
        android:src="@drawable/ic_create_white_24dp"
        app:layout_anchor="@id/recycler"
        app:layout_anchorGravity="bottom|right|end"/>
</merge>
Fab.java
public class Fab extends FloatingActionButton implements AnimatedFab {

    private static final int FAB_ANIM_DURATION = 200;

    public Fab(Context context) {
        super(context);
    }

    public Fab(Context context, AttributeSet attrs) {
        super(context, attrs);
    }

    public Fab(Context context, AttributeSet attrs, int defStyleAttr) {
        super(context, attrs, defStyleAttr);
    }

    /**
     * Shows the FAB.
     */
    @Override
    public void show() {
        show(0, 0);
    }

    /**
     * Shows the FAB and sets the FAB's translation.
     *
     * @param translationX translation X value
     * @param translationY translation Y value
     */
    @Override
    public void show(float translationX, float translationY) {
        // Set FAB's translation
        setTranslation(translationX, translationY);

        // Only use scale animation if FAB is hidden
        if (getVisibility() != View.VISIBLE) {
            // Pivots indicate where the animation begins from
            float pivotX = getPivotX() + translationX;
            float pivotY = getPivotY() + translationY;

            ScaleAnimation anim;
            // If pivots are 0, that means the FAB hasn't been drawn yet so just use the
            // center of the FAB
            if (pivotX == 0 || pivotY == 0) {
                anim = new ScaleAnimation(0, 1, 0, 1, Animation.RELATIVE_TO_SELF, 0.5f,
                        Animation.RELATIVE_TO_SELF, 0.5f);
            } else {
                anim = new ScaleAnimation(0, 1, 0, 1, pivotX, pivotY);
            }

            // Animate FAB expanding
            anim.setDuration(FAB_ANIM_DURATION);
            anim.setInterpolator(getInterpolator());
            startAnimation(anim);
        }
        setVisibility(View.VISIBLE);
    }

    /**
     * Hides the FAB.
     */
    @Override
    public void hide() {
        // Only use scale animation if FAB is visible
        if (getVisibility() == View.VISIBLE) {
            // Pivots indicate where the animation begins from
            float pivotX = getPivotX() + getTranslationX();
            float pivotY = getPivotY() + getTranslationY();

            // Animate FAB shrinking
            ScaleAnimation anim = new ScaleAnimation(1, 0, 1, 0, pivotX, pivotY);
            anim.setDuration(FAB_ANIM_DURATION);
            anim.setInterpolator(getInterpolator());
            startAnimation(anim);
        }
        setVisibility(View.INVISIBLE);
    }

    private void setTranslation(float translationX, float translationY) {
        animate().setInterpolator(getInterpolator()).setDuration(FAB_ANIM_DURATION)
                .translationX(translationX).translationY(translationY);
    }

    private Interpolator getInterpolator() {
        return AnimationUtils.loadInterpolator(getContext(), R.interpolator.msf_interpolator);
    }
}
sheet.xml
Sheet for adding new tasks in our application.
<?xml version="1.0" encoding="utf-8"?>
<merge xmlns:android="http://schemas.android.com/apk/res/android"
    xmlns:app="http://schemas.android.com/apk/res-auto">

    <!-- Overlay that dims the screen -->
    <com.gordonwong.materialsheetfab.DimOverlayFrameLayout
        android:id="@+id/overlay"
        android:layout_width="match_parent"
        android:layout_height="match_parent" />

    <!-- Circular reveal container for the sheet -->
    <io.codetail.widget.RevealLinearLayout
        android:layout_width="match_parent"
        android:layout_height="match_parent"
        android:gravity="end|bottom"
        android:orientation="vertical">

        <!-- Sheet that contains your items -->
        <android.support.v7.widget.CardView
            android:id="@+id/fab_sheet"
            android:layout_width="350dp"
            android:layout_height="200dp"
            android:layout_gravity="center_horizontal">

            <EditText
                android:id="@+id/text"
                android:layout_width="match_parent"
                android:layout_height="150dp"
                android:layout_gravity="top"
                android:gravity="top|left"
                android:inputType="textMultiLine"
                android:lines="4"
                android:maxLines="6"
                android:minLines="4"
                android:singleLine="false" />

            <Button
                android:id="@+id/add_task"
                android:background="@drawable/ripple"
                android:layout_width="match_parent"
                android:layout_height="48dp"
                android:layout_gravity="bottom"
                android:textColor="#fff"
                android:textStyle="bold"
                android:text="Add task"
                android:textAllCaps="true" />

        </android.support.v7.widget.CardView>
    </io.codetail.widget.RevealLinearLayout>
</merge>
3.3 MainActivity
Finally, let’s connect everything in our MainActivity.
public class MainActivity extends AppCompatActivity {

    @Bind(R.id.recycler)
    RecyclerView recyclerView;

    @Bind(R.id.fab)
    Fab fab;

    @Bind(R.id.fab_sheet)
    View sheetView;

    @Bind(R.id.overlay)
    View overlayView;

    @Bind(R.id.text)
    TextView textInputField;

    private MaterialSheetFab materialSheetFab;

    @Override
    protected void onCreate(Bundle savedInstanceState) {
        super.onCreate(savedInstanceState);
        setContentView(R.layout.activity_main);
        ButterKnife.bind(this);
        Toolbar toolbar = ButterKnife.findById(this, R.id.toolbar);
        fab.setBackgroundTintList(ContextCompat.getColorStateList(this, R.color.colorPrimary));
        setSupportActionBar(toolbar);
        setupMaterialSheetFab();
    }

    private void setupMaterialSheetFab() {
        int sheetColor = ContextCompat.getColor(this, R.color.background_light);
        int fabColor = ContextCompat.getColor(this, R.color.colorPrimary);

        materialSheetFab = new MaterialSheetFab(fab, sheetView, overlayView,
                sheetColor, fabColor);

        LinearLayout.LayoutParams params = (LinearLayout.LayoutParams) sheetView.getLayoutParams();
        Point size = new Point();
        getWindowManager().getDefaultDisplay().getSize(size);
        params.width = (int) (size.x * 0.9); // we don't want our sheet to cover whole width of the screen
        sheetView.setLayoutParams(params);
    }

    @OnClick(R.id.add_task)
    public void addTask() {
        if (materialSheetFab.isSheetVisible()) {
            materialSheetFab.hideSheet();
        }
    }

    @Override
    public void onBackPressed() {
        if (materialSheetFab.isSheetVisible()) {
            materialSheetFab.hideSheet();
        } else {
            super.onBackPressed();
        }
    }
}
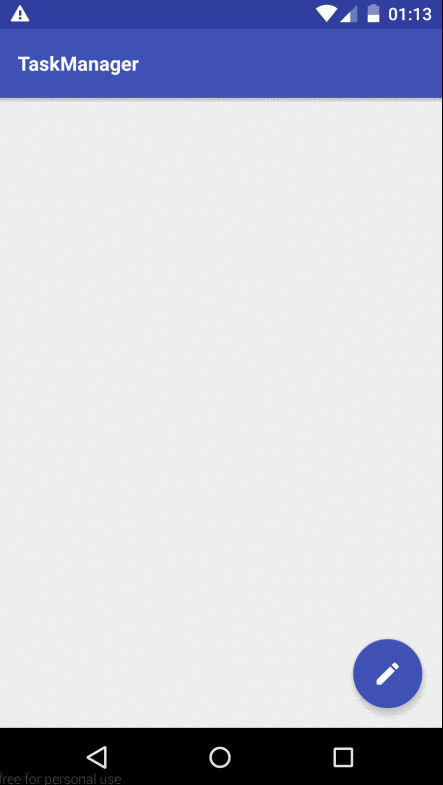
Result
3.4 Managing tasks
Since our basic UI of the main screen is done, we can now proceed to implement one of our main functionalities. To do that, we are going to define the Task model, corresponding TaskRowHolder, and finally the TaskAdapter. These classes are very simple, so I guess that no explanation is needed.
Task
public class Task {

    private boolean completed;
    private String text;

    public Task(String text) {
        this.text = text;
    }

    public boolean isCompleted() {
        return completed;
    }

    public void setCompleted(boolean completed) {
        this.completed = completed;
    }

    public String getText() {
        return text;
    }

    public void setText(String text) {
        this.text = text;
    }
}
TaskRowHolder
public class TaskRowHolder extends RecyclerView.ViewHolder {

    @Bind(R.id.task_name)
    TextView taskNameLabel;

    @Bind(R.id.checkbox)
    CheckBox checkBox;

    private Task task;

    public TaskRowHolder(View itemView) {
        super(itemView);
        ButterKnife.bind(this, itemView);
        checkBox.setOnCheckedChangeListener(new CompoundButton.OnCheckedChangeListener() {
            @Override
            public void onCheckedChanged(CompoundButton buttonView, boolean isChecked) {
                task.setCompleted(isChecked);
            }
        });
    }

    public void setTask(Task task) {
        this.task = task;
        taskNameLabel.setText(task.getText());
        checkBox.setChecked(task.isCompleted());
    }
}
TaskAdapter
public class TaskAdapter extends RecyclerView.Adapter<TaskRowHolder> {

    private List<Task> tasks = new LinkedList<>();

    public void addTask(Task task) {
        tasks.add(0, task);
        notifyItemInserted(0);
    }

    @Override
    public TaskRowHolder onCreateViewHolder(ViewGroup parent, int viewType) {
        View itemView = LayoutInflater.from(parent.getContext()).inflate(R.layout.view_task_row, parent, false);
        return new TaskRowHolder(itemView);
    }

    @Override
    public void onBindViewHolder(TaskRowHolder holder, int position) {
        holder.setTask(tasks.get(position));
    }

    @Override
    public int getItemCount() {
        return tasks.size();
    }

    public void removeTask(int position) {
        tasks.remove(position);
        notifyItemRemoved(position);
    }
}
view_task_row.xml
<?xml version="1.0" encoding="utf-8"?>
<android.support.v7.widget.CardView xmlns:android="http://schemas.android.com/apk/res/android"
    xmlns:card_view="http://schemas.android.com/apk/res-auto"
    android:id="@+id/card_view"
    android:layout_width="match_parent"
    android:layout_height="wrap_content"
    android:layout_gravity="center"
    android:layout_margin="4dp"
    card_view:cardCornerRadius="4dp">

    <RelativeLayout
        android:layout_width="match_parent"
        android:layout_height="wrap_content"
        android:layout_margin="4dp"
        android:orientation="horizontal"
        android:padding="8dp">

        <TextView
            android:id="@+id/task_name"
            android:layout_width="match_parent"
            android:layout_height="wrap_content"
            android:layout_centerVertical="true"
            android:layout_marginLeft="8dp"
            android:layout_alignParentLeft="true"
            android:layout_toLeftOf="@id/checkbox"
            android:fontFamily="sans-serif-light"
            android:textSize="18sp" />

        <CheckBox
            android:id="@+id/checkbox"
            android:layout_width="wrap_content"
            android:layout_height="wrap_content"
            android:layout_alignParentRight="true"
            android:layout_centerVertical="true"
            android:layout_marginLeft="8dp" />

    </RelativeLayout>
</android.support.v7.widget.CardView>
Now we need to connect our code to MainActivity.
public class MainActivity extends AppCompatActivity {

    ...

    private TaskAdapter taskAdapter = new TaskAdapter();

    @Override
    protected void onCreate(Bundle savedInstanceState) {
        ...

        recyclerView.setAdapter(taskAdapter);
        recyclerView.setLayoutManager(new LinearLayoutManager(getBaseContext()));
    }

    ...

    @OnClick(R.id.add_task)
    public void addTask() {
        ...

        Task newTask = new Task(textInputField.getText().toString());
        textInputField.setText("");
        taskAdapter.addTask(newTask);
    }
}
Result

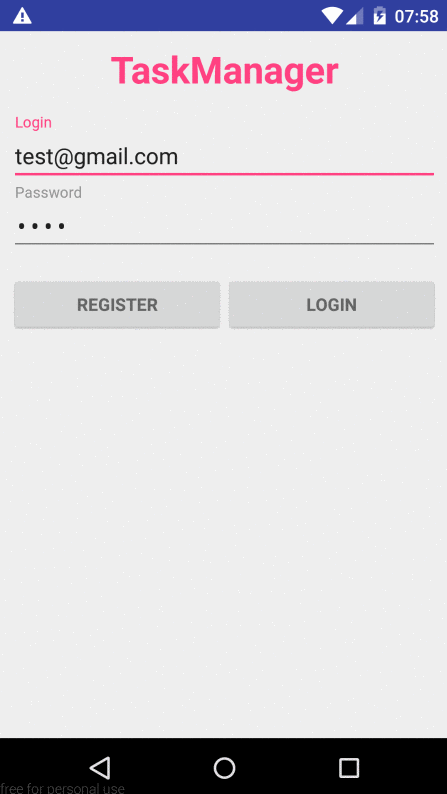
3.5 Login screen UI
We need some kind of authentication since our data will be connected to particular users. Therefore, in one of the incoming posts we are going to implement the auth logic using Realm (yes, Realm provides this feature :)).
However, we will also need the UI part of login to collect the user data.
A pretty simple layout of the login screen. It will have two fields (username + password) and two actions (register + login).
login_activity.xml
<RelativeLayout xmlns:android="http://schemas.android.com/apk/res/android"
    xmlns:app="http://schemas.android.com/apk/res-auto"
    xmlns:tools="http://schemas.android.com/tools"
    android:layout_width="match_parent"
    android:layout_height="match_parent"
    android:gravity="center_horizontal"
    android:orientation="vertical">

    <TextView
        android:id="@+id/title"
        android:layout_alignParentTop="true"
        android:layout_width="match_parent"
        android:layout_height="wrap_content"
        android:textSize="30sp"
        android:paddingTop="10dp"
        android:gravity="center"
        android:textStyle="bold"
        android:textColor="@color/colorAccent"
        android:text="TaskManager"/>

    <LinearLayout
        android:layout_below="@id/title"
        android:id="@+id/form"
        android:layout_width="match_parent"
        android:layout_height="wrap_content"
        android:layout_marginLeft="8dp"
        android:layout_marginRight="8dp"
        android:orientation="vertical"
        android:paddingBottom="10dp"
        android:paddingTop="16dp">

        <android.support.design.widget.TextInputLayout
            android:layout_width="match_parent"
            android:layout_height="wrap_content">

            <AutoCompleteTextView
                android:id="@+id/username"
                android:layout_width="match_parent"
                android:layout_height="wrap_content"
                android:text="test@gmail.com"
                android:hint="Login"
                android:inputType="textAutoComplete"
                android:maxLines="1"
                android:singleLine="true" />

        </android.support.design.widget.TextInputLayout>

        <android.support.design.widget.TextInputLayout
            android:layout_width="match_parent"
            android:layout_height="wrap_content">

            <EditText
                android:id="@+id/password"
                android:layout_width="match_parent"
                android:layout_height="wrap_content"
                android:text="test"
                android:hint="Password"
                android:imeActionId="@+id/log_in"
                android:imeActionLabel=""
                android:imeOptions="actionUnspecified"
                android:inputType="textPassword"
                android:maxLines="1"
                android:singleLine="true" />

        </android.support.design.widget.TextInputLayout>

        <LinearLayout
            android:layout_width="match_parent"
            android:layout_marginTop="16dp"
            android:layout_height="wrap_content"
            android:orientation="horizontal">

            <Button
                android:id="@+id/register"
                style="?android:textAppearanceSmall"
                android:layout_weight="0.5"
                android:layout_width="0dp"
                android:layout_height="wrap_content"
                android:text="Register"
                android:textStyle="bold" />

            <Button
                android:id="@+id/login"
                style="?android:textAppearanceSmall"
                android:layout_weight="0.5"
                android:layout_width="0dp"
                android:layout_height="wrap_content"
                android:text="Login"
                android:textStyle="bold" />
        </LinearLayout>

    </LinearLayout>

    <ProgressBar
        android:layout_below="@id/form"
        android:id="@+id/progress"
        android:layout_centerHorizontal="true"
        style="?android:attr/progressBarStyleLarge"
        android:layout_width="wrap_content"
        android:layout_height="wrap_content"
        android:layout_marginBottom="8dp"
        android:visibility="gone"
        tools:visibility="visible" />
</RelativeLayout>
Out Login Screen implementation is also really basic, but we will come back to it later.
LoginActivity
public class LoginActivity extends AppCompatActivity {

    @Bind(R.id.username)
    TextView usernameLabel;

    @Bind(R.id.password)
    TextView passwordLabel;

    @Bind(R.id.progress)
    View progressView;

    @Override
    protected void onCreate(Bundle savedInstanceState) {
        super.onCreate(savedInstanceState);
        setContentView(R.layout.login_activity);
        ButterKnife.bind(this);
    }

    @OnClick(R.id.login)
    public void login() {
        showMainScreen();
    }

    private void showMainScreen() {
        Intent intent = new Intent(this, MainActivity.class);
        intent.addFlags(Intent.FLAG_ACTIVITY_NEW_TASK | Intent.FLAG_ACTIVITY_CLEAR_TASK);
        startActivity(intent);
    }

    @OnClick(R.id.register)
    public void register() {
    }
}
Don’t forget to update AndroidManifest!
<manifest xmlns:android="http://schemas.android.com/apk/res/android"
    package="pl.adriankremski.taskmanager">

    <application
        android:allowBackup="true"
        android:icon="@mipmap/ic_launcher"
        android:label="@string/app_name"
        android:supportsRtl="true"
        android:theme="@style/AppTheme">

        <activity android:name=".LoginActivity">
            <intent-filter>
                <action android:name="android.intent.action.MAIN" />

                <category android:name="android.intent.category.LAUNCHER" />
            </intent-filter>
        </activity>

        ...

    </application>

</manifest>
Result
Thanks for reading!
The next part of the series is already available!
Part 2: REALM MOBILE PLATFORM: OFFLINE-FIRST TASKMANAGER APP – BASICS OF REALM