


When you work as a mobile Flutter developer, you need to know both ecosystems: Android and iOS. When it comes to building and deploying your new app, you need to learn a lot about certificates, profiles, tracks, stores, etc. That is a lot! Especially when you do it for the first time. Thankfully, some tools can make your life a bit easier. In this article, I will show you how to automate the build and delivery process of your mobile applications written in Flutter using Fastlane tools.
Configuration
When you create a new project in Flutter, you can run your new application immediately in the simulator. It is also possible to run your new app on an Android device without any additional configuration but to run it on an iOS device; you need to be a part of the apple development program to be able to create a proper certificate and provisioning profile.
However, let’s start with the Android configuration first.
Android
The first thing that you need to do is to set the proper application ID in the file android/app/build.gradle:
In the default Config section, find the application Id property and edit it. By default it is set to “com.example.<your-app-name>” (follow the reverse domain name notation convention)
android/app/build.gradle
defaultConfig {
    applicationId "your.application.id.goes.here"
}
To publish your application on the Google Play Store, you need to create an upload keystore; if you are working on a Mac, run the following command in the main folder of your Flutter app.
keytool -genkey -v -keystore ./android/upload-keystore.jks -keyalg RSA -keysize 2048 -validity 10000 -alias your-key-upload-alias
Follow the instructions that you will see in the command line, you will need to provide the keystore password and answer the following questions:
What is your first and last name?
What is the name of your organizational unit?
What is the name of your organization?
What is the name of your city or locality?
What is the name of your state or province?
What is the two-letter country code for this unit?
When you have answered all those questions and confirmed your choice, now it is time to connect your generated keystore with the Android code.
If you created your key using the above keytool command, your newly created key should be present in your project in the Android folder: `<your-project>/android/upload-keystore.jks`
Now, in the same folder, create a file with all of the properties of your key:
key.properties
storePassword=<your-password>
keyPassword=<your-password>
keyAlias=<your-key-upload-alias>
storeFile=<absolute-path-to-your-key>
Important note, add both files: upload-keystore.jks and key.properties files to .gitignore to not commit these to your repository!
Now, you need to apply a few changes to the android/app/build.gradle file:
At the top of that file, add the following code to read your key properties.
def keystoreProperties = new Properties()
def keystorePropertiesFile = rootProject.file('key.properties')
if (keystorePropertiesFile.exists()) {
   keystoreProperties.load(new FileInputStream(keystorePropertiesFile))
}
In the same file, edit the signingConfigs and buildTypes sections:
signingConfigs {
  release {
    keyAlias keystoreProperties['keyAlias']
    keyPassword keystoreProperties['keyPassword']
    storeFile keystoreProperties['storeFile'] ? file(keystoreProperties['storeFile']) : null
    storePassword keystoreProperties['storePassword']
  }
}

buildTypes {
  release {
    signingConfig signingConfigs.release
  }
}
Now, let’s go to the iOS configuration.
iOS
As for the Android configuration, you can use any code editor of your choice to apply changes to the application settings, but for the iOS configuration, you have to use Xcode.
The first thing that you need to do, is to set up the Bundle identifier. You can do that in the Runner General tab:
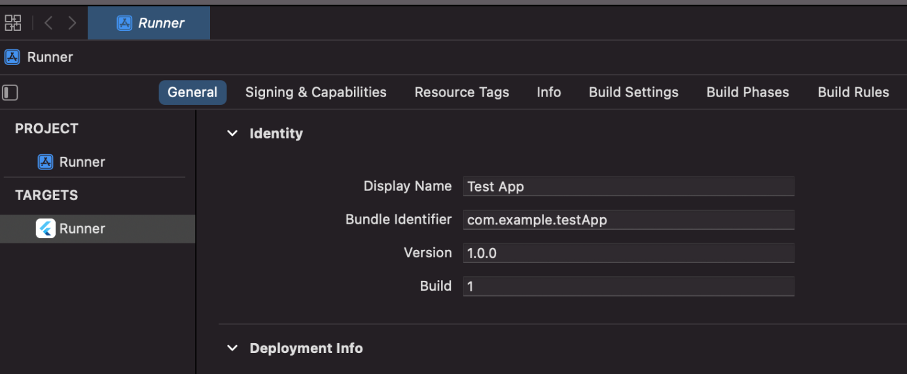
I encourage you to keep your bundle identifier (iOS) and application ID (Android) consistent to avoid confusion.
Next, you need to register your identifier in the apple developer portal. Go to: https://developer.apple.com/account/resources/identifiers/list and follow the instructions.

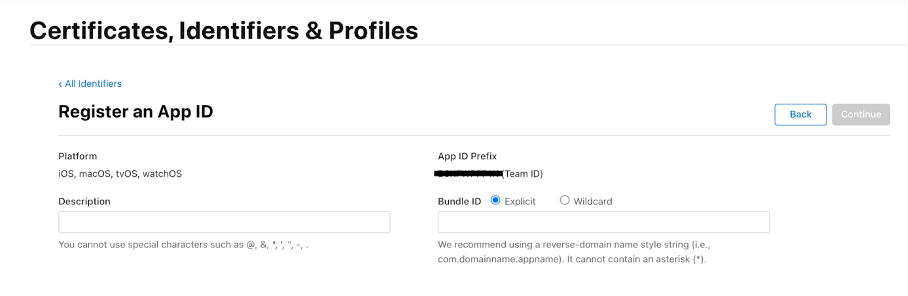
Paste your Bundle identifier into the Bundle ID input field and click continue.
To run your app using a real device, you will need to create an app certificate and provisioning profile. You can obtain all of that using Xcode automatic signing management, but I personally find it a bit problematic. At some point, managing multiple certificates and duplicated profiles becomes an issue. Especially when you are working with many projects at the same time. To avoid all of that trouble, I use the Fastlane match tool. Instead of having multiple accounts for every developer in your project, you could use just one service account that manages all of that for you.
Let’s start with the Fastlane setup:
In the main folder of your application, create a Gemfile with the following content:
source "https://rubygems.org"

gem "fastlane"
gem "cocoapods"
plugins_path = File.join(File.dirname(__FILE__), 'fastlane', 'Pluginfile')
eval_gemfile(plugins_path) if File.exist?(plugins_path)
Fastlane tools are based on ruby so make sure that you have Ruby installed in the latest version on your MacBook. Then, in the console, run `bundle install` to install Fastlane.
Now, in the main folder of your app, create a `fastlane` folder with two files: Fastfile and Matchfile.
Matchfile
storage_mode("git")
The content of the Matchfile informs Fastlane that we want to use git to store our certificates and profiles.
Fastfile
before_all do |lane, options|
  if File.exist?("../.env")
    open("../.env", 'r').readlines.each do |l|
      kv = l.split('=')
      if kv.length > 1
        ENV[kv[0]] = kv[1].chomp
      end
    end
  end
end

platform :ios do
  desc "Configure ios app for local development"
  lane :development do |options|
    match(
      type: "development",
      app_identifier: ENV['APPLICATION_ID'],
      git_branch: ENV['CERTIFICATES_REPO_BRANCH'],
      username: ENV['IOS_APPLE_ID_EMAIL'],
      git_url: ENV['CERTIFICATES_REPO'],
      team_id: ENV['IOS_TEAM_ID'],
    )

    update_code_signing_settings(
      path: "ios/Runner.xcodeproj",
      use_automatic_signing: false,
      profile_name: 'match Development <YOUR-BUNDLE-IDENTIFIER>'
    )
  end
end
In the Fastfile, this code is responsible for reading all of the necessary variables from the .env file and setting up your project for iOS development.
Now, you should be able to run command:
fastlane ios development
- match function will create or fetch all the necessary certificates and profiles for your application. Note that the match function uses `type: “development”` as the argument, which is important because you will use a different provisioning profile for development and another one for production.
- update_code_signing_settings will update Xcode settings to include the project provisioning profile. Be aware that this script is not perfect. If you get any errors during the build time, check the Xcode signing section and adjust the settings manually.
Building and deployment
Apps setup for development and automatic deployment seem like a lot of work, but thankfully you need to do it only once per project, and then in the future, you will reduce a lot of work as a result from having everything automated.
Again, let’s start with the Android app.
Android
If you configured your app using the instructions given above, there is only one more thing to do. You need to get a service account key from Google Play. Detailed instructions on how to get it and configure are described here: https://docs.fastlane.tools/actions/upload_to_play_store/. When you fetch the file, paste it into the main folder of your application. Note that you have to be an account owner of the Google Play account to fetch that key. Even if you have developer access with admin privileges, you won’t be able to do it. You have to be the main owner of the account.
The build and deploy process is fairly simple. For that purpose, I use 2 Fastlane tools:
google_play_track_version_codes – to track the latest uploaded version to the store and increment that during the build process and upload_to_play_store – to push the built bundle to the store. Add the following code to the Fastlane/Fastfile.
platform :android do
  "Deploy android app to the Google Play Store"
  lane :store do |options|
    version_code = google_play_track_version_codes(track: 'internal', json_key: "<PATH-TO-YOUR-APP-SERVICE_ACCOUNT_KEY>", package_name: ENV['APPLICATION_ID'])[0] + 1

    Dir.chdir ".." do
      sh("flutter", "packages", "get")
      sh("flutter", "clean")
      sh("flutter", "build", "appbundle", "--build-number=#{version_code}", "--release")
    end

    upload_to_play_store(
      track: "internal",
      aab: "./build/app/outputs/bundle/release/app-release.aab",
      version_name: "v#{version_code}",
      json_key: "<PATH-TO-GOOGLE-PLAY-SERVICE-ACCOUNT-KEY>",
      package_name: ENV['APPLICATION_ID'],
      release_status: "draft"
    )
  end
end
```
In short, this code fetches the latest build number from the Google Play Store, building the application using the Fastlane shell tool and then uploading the bundle to Google Play Store.
Note that I use Google Play’s “internal” track, but you can use “alpha”, “beta”, or “production” depending on your testing cycle.
Now you should be able to run the following command:
fastlane android store
That’s it! Now you are able to upload your new app to the Google Play Store. Fastlane has a robust plugin system, so you can modify the above lane to publish your app first to firebase app distribution or app center for testing.
Now, let’s go to the iOS part:
iOS
Build process and deployment is a bit more complicated due to the iOS app signing process, but let’s see how it looks in the code:
platform :ios do
    desc "Deploy ios app the test flight"
    lane :store do |options|
      match(
        type: "appstore",
        app_identifier: ENV['APPLICATION_ID'],
        git_branch: ENV['CERTIFICATES_REPO_BRANCH'],
        username: ENV['IOS_APPLE_ID_EMAIL'],
        git_url: ENV['CERTIFICATES_REPO'],
        team_id: ENV['IOS_TEAM_ID']
      )

      update_code_signing_settings(
        path: "ios/Runner.xcodeproj",
        use_automatic_signing: false,
        profile_name: 'match AppStore <YOUR-BUNDLE-IDENTIFIER>'
      )

      version_code = latest_testflight_build_number(
        username: ENV['IOS_APPLE_ID_EMAIL'],
        app_identifier: ENV['APPLICATION_ID'],
        team_id: ENV['FASTLANE_ITC_TEAM_ID']
      ) + 1

      Dir.chdir ".." do
        sh("flutter", "packages", "get")
        sh("flutter", "clean")
        sh("flutter", "build", "ios",
          "--build-number=#{version_code}",
          "--release", "--no-codesign")
      end
      build_ios_app(scheme: "#{options[:environment]}", workspace: "ios/Runner.xcworkspace")
      upload_to_testflight(username: ENV['IOS_APPLE_ID_EMAIL'], team_id: ENV['FASTLANE_ITC_TEAM_ID'], app_identifier: ENV['APPLICATION_ID'])
    end
end
First, the match and update_code_signing_settings functions are similar to the development settings. The only difference is that, now, we are using another type of provisioning profile. Instead of “development”, now it is “appcenter”.
To get the latest version number uploaded to the test flight, I use the tool latest_testflight_build_number to have a consistent version order in the test flight.
Then, the app is built using the flutter build tool, but code signing is skipped and done by the build_ios_app. In the end, the generated ipa file is uploaded to testflight using upload_to_testflight action.
Now, you should be able to run the following command:
fastlane ios store
That’s it! Now, you can upload your new app to the test flight and release it to end users after tests.
Variables
Below, you can find all the necessary environment variables that Fastlane will need for development and deployment with a short description:
APPLICATION_ID – is a bundle ID that you specified in the XCode in the step above.
CERTIFICATES_REPO – link to your git repository where you want to store your certificates and profiles.
CERTIFICATES_REPO_BRANCH – the name of the branch where you want to keep certificates and profiles in. It is a good practice to name it your project.
IOS_APPLE_ID_EMAIL – email address for the identity that you want to use to distribute your apps – the best option is to have a service account for your team, see code signing guide.
FASTLANE_PASSWORD – password to the account that uses IOS_APPLE_ID_EMAIL.
IOS_TEAM_ID – a team ID that your Apple email belongs to; you can find it in the Apple developer portal.
FASTLANE_ITC_TEAM_ID – ID of a team in the app store connect. Surprisingly, it is not so easy to find it. You can go to that link and look for contentProvider.contentProviderId in the json response or run Fastlane actions without that variable for the first time, and copy it from the command line when Fastlane action asks you to choose a team from the list.
MATCH_PASSWORD and MATCH_KEYCHAIN_PASSWORD – passwords that Fastlane will use to store and encrypt your certificates. Generate secure passwords per project.
FASTLANE_APPLE_APPLICATION_SPECIFIC_PASSWORD – if your account has been 2FA enabled, go to http://appleid.apple.com/ click passwords, and then click Generate App-Specific Password.