


The world is developing quickly. Not so long ago, if you had forgotten to bring your wallet to a store, you would have a lot of trouble getting what you came to buy – but these days, we’re all very familiar with the opportunities of mobile payments. Most of us have even heard the name of the technology behind this payment method – NFC, which stands for Near Field Communication. Well, it is mainly known for making payments, but what else could we use it for? How does it even work? How can you implement your own app using NFC in Flutter? If you’re interested, read on.
How it works?
Basically, NFC technology works on the principle of loading and saving data to an NFC tag that both smartphones and card terminals possess. The tags are small, look like stickers and are pretty cheap to buy online (they cost less than a dollar each or around PLN 2). They send radio waves to activate the receiving device, such as a smartphone. This can be done over a very short distance (around 10 cm). What is cool about NFC tags is that they operate without a battery – instead, they draw power from the recipient device during the connection.
NFC tags come in a wide array of data formats. The best-supported one is the NDEF format. This basically means that the data is encapsulated inside a message called NdefMessage, which contains one or more records – NdefRecords.
Going deeper, an NDEF record consists of two components:
- Record type – which describes the payload data with one of the defined NDEF record types
- Payload – which is the actual data of the record
What else could it do?
As we established, NFC is mainly known for contactless payments. However, this technology is very underappreciated and offers much more. It could be used for all sorts of things, starting with automating everyday tasks. For example, what if libraries attached an NFC tag to each book? Scanning it would pop up a screen on the user’s mobile with details of the book and an interface to be able to borrow it. What if the tags were used to access sensitive information or credentials simply by scanning them to log in? This technology could also be used in the medical field to quickly access patient data – for example, from a medical wristband.
Imagine not having to manually search for the right network in a hotel or restaurant and then typing in a cumbersome Wi-Fi password. Instead, you could just place your phone over an NFC tag and copy the text to your clipboard, or have the tag take you directly to an app that would handle the connection for you.
These are just some basic examples, but once we realize how many things could be sped up by using these handy little tags, the possibilities are not endless, but very numerous.
The Shortcuts
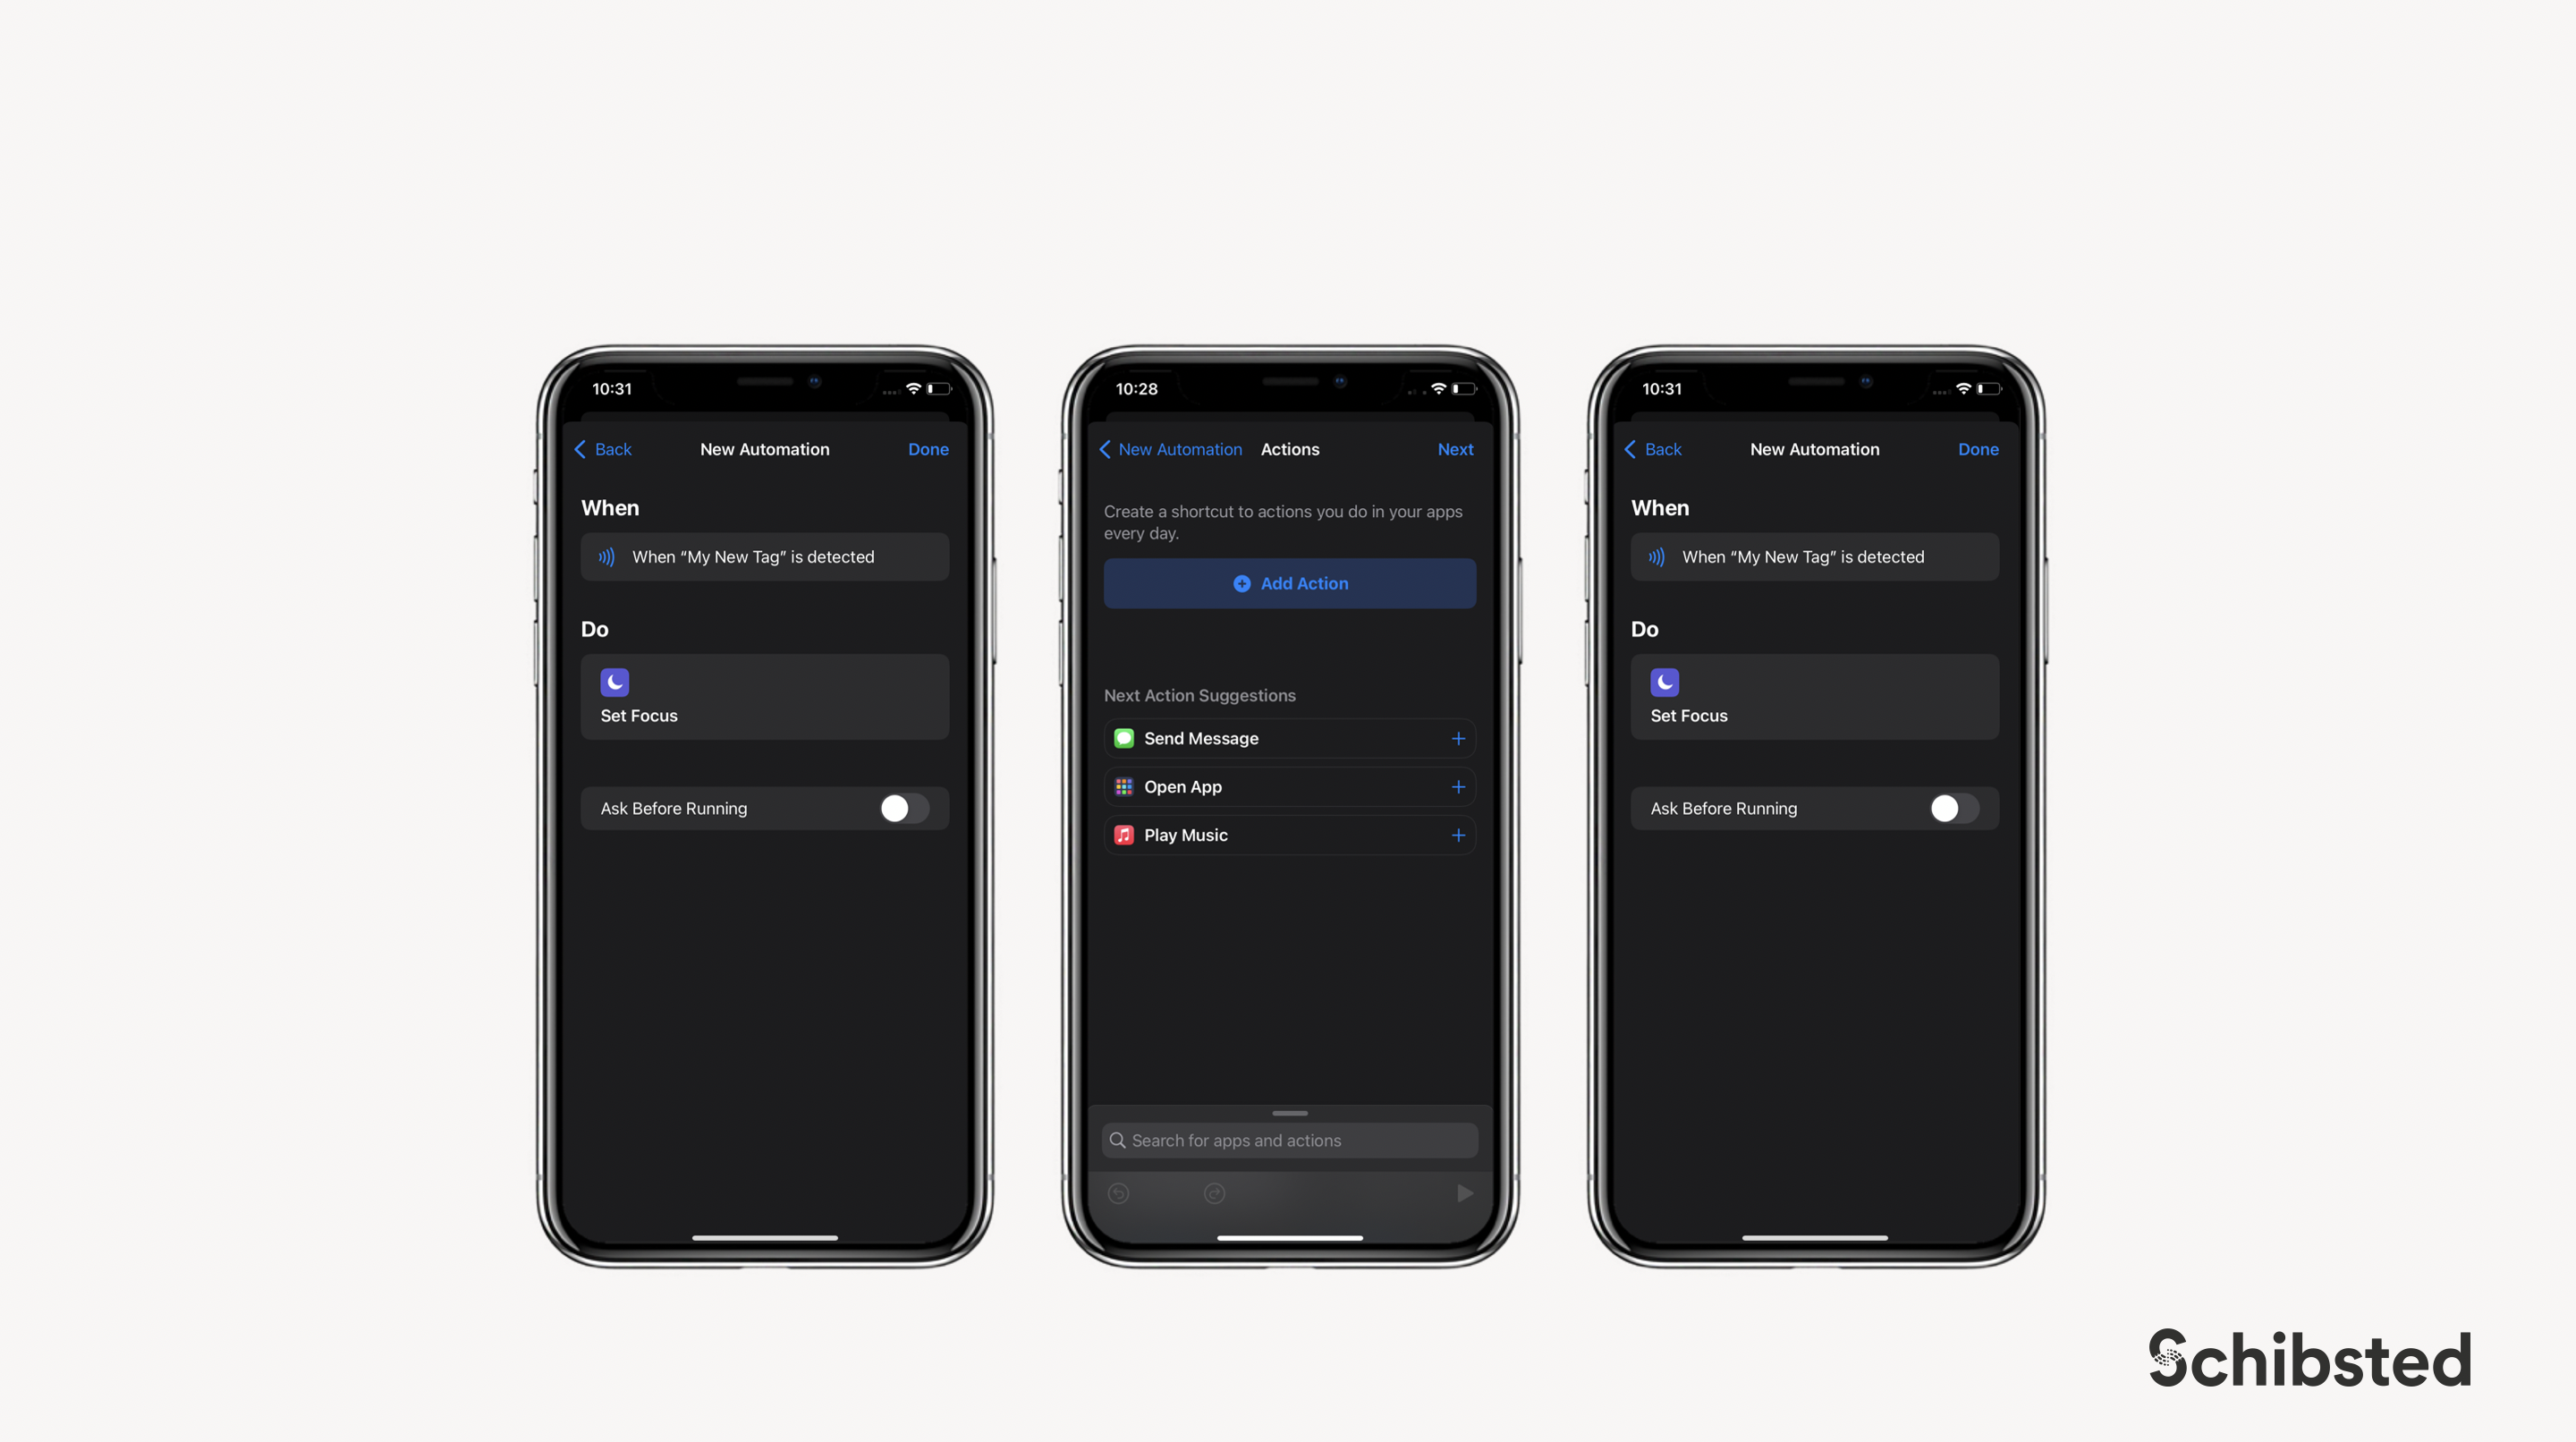
This automation of everyday tasks is especially easy with a native iOS app called Shortcuts. It is designed to help make tedious and repetitive things so much simpler. It can handle many things, but let’s just focus on NFC functionality, which enables you to scan a tag into the app, name it, and then program it by placing your mobile above it. This could trigger music, open a specific app, or even change some phone settings. For example, if you stick the NFC tag onto your car phone holder, then, once you enter the vehicle and place your smartphone there, this technology could automatically turn on focus mode and start up the Maps application to be instantly ready for the drive. Quite handy, isn’t it?
Opening URLs
Another nice feature is opening URLs directly after scanning the tag – this behavior is built in for both iOS and Android devices, so once it recognizes that the tag contains an URL as its data payload, it would automatically open it in the browser. This is even quicker than scanning a QR code redirecting to a web page.
Opening an app – Android
When scanning the NFC tag, the device determines which application should handle the received data. As mentioned, the default browser is opened if it’s an URL. If not, it scans for an application that filters for the specific event that was detected and handles it accordingly. This is done using intent filters. An intent filter is an expression in an app’s manifest file that specifies the type of intent the app would like to receive. Adding an intent filter to an activity in your app enables other apps to start your activity when such intent is discovered.
Therefore, if we wanted to build an app that should intercept NFC scanning data, we would need to add an intent filter to the main activity tag in the AndroidManifest.xml file.
<activity>
  <intent-filter>
    <action android:name="android.nfc.action.TAG_DISCOVERED" />
    <category android:name="android.nfc.category.DEFAULT" />
  </intent-filter>
</activity>
There are a couple of options here. The TAG_DISCOVERED action creates a basic filter, catching all sorts of NFC data. If we wanted to be more specific, we could use NDEF_DISCOVERED to catch only data in NDEF format. Also, the filter could be even more precise if we added the type of data that you’re expecting in the app, like plain text:
<intent-filter>
 <action android:name="android.nfc.action.NDEF_DISCOVERED" />
 <category android:name="android.nfc.category.DEFAULT" />
   <data
       android:scheme="https"
       android:host="developer.android.com"
       android:mimeType="text/plain" />
</intent-filter>
Or filter by specific URL:
<intent-filter>
 <action android:name="android.nfc.action.NDEF_DISCOVERED" />
 <category android:name="android.nfc.category.DEFAULT" />
   <data
       android:scheme="https"
       android:host="developer.android.com"
       android:pathPrefix="/index.html" />
</intent-filter>
Then the tag dispatch system sends the intent to an interested application that filters for the intent. If more than one application can handle the intent, the Activity Chooser is presented so the user can select the desired app.
There is also another way to ensure that the right application answers the tag. This is enabled by Android Application Record (AAR). An AAR has the package name of an application embedded inside an NDEF record. You can add an AAR to any NDEF record of your NDEF message, and once the device finds it inside the data, it starts the application (or launches Google Play if it has not been downloaded yet).
How to trigger opening an app both on Android and iOS if we’re planning to share the NFC tag with multiple devices? One possible solution would be to create a web page redirecting the user to the desired screen based on the platform he is using.
So, enough theory. What if we wanted to create our own app and customize the NFC tag capabilities? Let’s see how it could be done in Flutter.
How to implement it?
For testing purposes, a simple example app has been created, presenting the layout of the Kraków office with visible zones that can be selected by the user. There are two buttons, one to start scanning the NFC tag, which would, in turn, highlight the zone corresponding to the ID found in the tag’s data, and the second one for saving the currently selected zone ID to the NFC tag.

After initializing a new Flutter app (which we could do with the command flutter create new_app_name), the first step would be to find a library for handling the scanning of NFC tags. Here we’re using one called nfc_flutter_kit (https://pub.dev/packages/flutter_nfc_kit).
According to its documentation, we need to prepare some things to enable the handling of NFC on both platforms.
On Android, we would need to add android.permission.NFC to the AndroidManifest.xml.
This means that such a line of code must be added before the <application> tag:
<uses-permission android:name="android.permission.NFC" />
For iOS, on the other hand, there is much more to prepare.
First, the Near Field Communication Tag Reader Session Formats Entitlement must be added to the app’s entitlements. This means that we need to create a file called nfc.entitlements in the /iOS directory of the app, then paste this into the new file:
<?xml version="1.0" encoding="UTF-8"?>
<!DOCTYPE plist PUBLIC "-//Apple//DTD PLIST 1.0//EN" "http://www.apple.com/DTDs/PropertyList-1.0.dtd">
<plist version="1.0">
 <dict>
   <key>com.apple.developer.nfc.readersession.formats</key>
   <array>
      <string>TAG</string>
      <string>NDEF</string>
   </array>
 </dict>
</plist>
Second, we need to work on the Info.plist file.
These lines must be added inside the <dict> tag (you could write whatever applies to your app in the field NFCReaderUsageDescription).
<key>NFCReaderUsageDescription</key>
<string>Testing out NFC tags in app</string>
<key>com.apple.developer.nfc.readersession.felica.systemcodes</key>
<array>
 <string>8005</string>
 <string>8008</string>
 <string>0003</string>
 <string>fe00</string>
 <string>90b7</string>
 <string>927a</string>
 <string>86a7</string>
</array>
<key>com.apple.developer.nfc.readersession.iso7816.select-identifiers</key>
<array>
 <string>A0000002471001</string>
 <string>A000000003101001</string>
 <string>A000000003101002</string>
 <string>A0000000041010</string>
 <string>A0000000042010</string>
 <string>A0000000044010</string>
 <string>44464D46412E44466172653234313031</string>
 <string>D2760000850100</string>
 <string>D2760000850101</string>
 <string>00000000000000</string>
</array>
The last thing to do is to open Runner.xcodeproj with Xcode and add the Near Field Communication Tag Reading capability to your app. To do this, navigate to project settings and then to the tab Signing & Capabilities. Next, select the Runner in targets in the left sidebar, then press the “+ Capability” in the left upper corner and choose Near Field Communication Tag Reading.

We’re done with the preparations; let’s dive into writing the code. Now, we need to add the library flutter_nfc_kit as a dependency in file pubspec.yaml.
Then, add an import on top of the file where we want to keep our NFC handling logic:
import 'package:flutter_nfc_kit/flutter_nfc_kit.dart';
Let’s start with reading the tags. So, here’s how to write a readNFCTag function:
First, we need to check if the device we are using has NFC switched on. If not, we will show a snackbar with such information and exit the function:
var availability = await FlutterNfcKit.nfcAvailability;
if (availability != NFCAvailability.available) {
 ScaffoldMessenger.of(context).showSnackBar(SnackBar(
  content: Text('NFC not available'), backgroundColor: Colors.black));
 return;
}
If the NFC is on, the next step would be to scan the tag. But, beforehand, it would be wise to ensure that there is no active scanning session. So, let’s add a simple line to close any connection that might have started already.
await FlutterNfcKit.finish();
Scanning the tag is done using the poll method, where we can specify a timeout, which only works for Android; and using alert messages – only for iOS.
var tag = await FlutterNfcKit.poll(
 timeout: Duration(seconds: 50),
 iosMultipleTagMessage: "Multiple tags found!",
 iosAlertMessage: "Scan your tag");
If a tag was discovered successfully and its content is recognizable (in NDEF format), we could access the data from the tag and use it for what we want. For now, we save it to a global variable selectedZoneId (this line could look different, depending on the chosen state management method). To do that, we need to parse the record that we receive from the tag, as we’re only interested in the ID that comes after the “=” character.
if (tag.ndefAvailable!) {
  var result = await FlutterNfcKit.readNDEFRecords(cached: false);
  var record = result.isEmpty ? null : result.first;
  String zoneId = record.toString().split("=").last;
  selectedZoneId = zoneId;
}
The last step would be to close the connection using:
await FlutterNfcKit.finish();
This is basically how it’s done. However, there are important differences between iOS and Android platforms when it comes to scanning NFC tags that we should address here. iOS devices have a built-in dialog that appears during the scan. It gives the user an indication of what happens when the tag is being scanned. In Android, however, there is nothing like that. But we could add a custom dialog to make it more like iOS behaviour.
 For this to happen, we would need to make two alterations to the earlier code.
Right before scanning the tag, let’s add an if check to know whether an Android device is being used, and if so, to call the function to show a dialog, which we will build later:
if (Platform.isAndroid) {
 showAndroidInfoDialog(context, "Scanning NFC tag");
}
To enable this platform checking, we need to add an import to the top of the file:
import 'dart:io' show Platform;
We need to pass two things to showAndroidInfoDialog as arguments: context, to enable closing the dialog with:
Navigator.pop(context);
and the title that should be displayed on the dialog. This way, the method could be reusable both in scanning and in saving data to the tag; we would just need to change the title that is passed to it as an argument. The second change is for the final step – closing the connection. Again, this would differ between the two platforms; on Android, we would need to manually close the dialog using Navigator and finish the connection. If the platform is not Android, the code remains the same.
if (Platform.isAndroid) {
 Navigator.pop(context);
 await Future.delayed(Duration(seconds: 1));
 await FlutterNfcKit.finish();
} else {
 await FlutterNfcKit.finish();
}
As you might have noticed, in between closing the dialog and finishing the connection, there is a delay of one second. Why is that? This is to avoid the Android default behavior. Any time an Android device discovers an NFC tag, and no other application intercepts the data; it triggers a new screen that shows the content of the data:
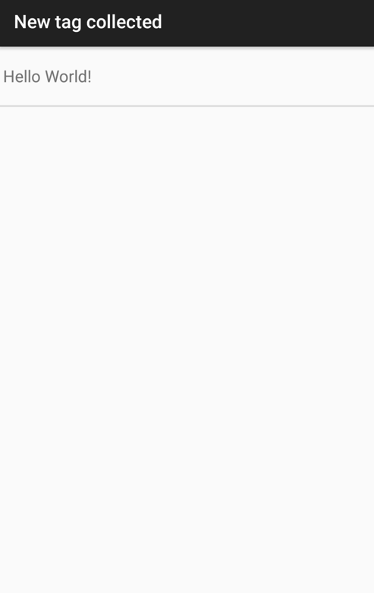
If we want to stop that from happening and stay on our app’s screen, we need to make sure that the connection is closed only after we exit our readNFCTag function. If not, when placing the Android device near the NFC tag, the scanning could happen twice and the second time it would not be intercepted by the poll method; therefore, it would open the default Android screen, which we do not want. Adding the one-second delay resolves this issue.
So, that’s it for the reading of the tags. The whole function should look like this by now:
 void readNFCTag(BuildContext context) async {
   var availability = await FlutterNfcKit.nfcAvailability;
    if (availability != NFCAvailability.available) {
      ScaffoldMessenger.of(context).showSnackBar(SnackBar(
        content: Text('NFC not available'), backgroundColor: Colors.black));
      return;
    }

    await FlutterNfcKit.finish();

    if (Platform.isAndroid) {
      showAndroidInfoDialog(context, "Scanning NFC tag");
    }

    var tag = await FlutterNfcKit.poll(
        timeout: Duration(seconds: 50),
        iosMultipleTagMessage: "Multiple tags found!",
        iosAlertMessage: "Scan your tag");

    if (tag.ndefAvailable!) {
      var result = await FlutterNfcKit.readNDEFRecords(cached: false);
      var record = result.isEmpty ? null : result.first;
      String zoneId = record.toString().split("=").last;
      selectedZoneId = zoneId;
    }

    if (Platform.isAndroid) {
      Navigator.pop(context);
      await Future.delayed(Duration(seconds: 1));
      await FlutterNfcKit.finish();
    } else {
      await FlutterNfcKit.finish();
    }
 }
The function that handles saving data to the tag could look very similar. The one main difference is that after the polling method, we check whether the tag is NDEF writable, and if so, we could pass an array of records into the writeNDEFRecords method. As we only want to save the selectedZoneId, we just need one record parsed to TextRecord. We need to add an import on top of the file to use this format.
import 'package:ndef/ndef.dart' as ndef;
Let’s also wrap the saving data in try/catch block and add snackbars indicating whether we succeeded in saving or not.
So, the part handling the writing would look like this:
if (tag.ndefWritable!) {
 try {
   await FlutterNfcKit.writeNDEFRecords(
     [new ndef.TextRecord(
       text: selectedZoneId.toString(), language: "en", encoding: ndef.TextEncoding.UTF8)]);
        ScaffoldMessenger.of(context).showSnackBar(SnackBar(
           content: Text('Zone saved to tag'), backgroundColor: Colors.black));
     } catch (e) {
       ScaffoldMessenger.of(context).showSnackBar(SnackBar(
          content: Text('Failed to save zone'),
          backgroundColor: Colors.black));
     }
}
The rest would look the same as in readNFCTag function, except for passing a different dialog title for Android:
if (Platform.isAndroid) {
  showAndroidInfoDialog(context, "Saving data to NFC tag");
}
So that’s the core NFC functionality. To expand this, we could create a function to build a dialog for Android, as mentioned before. The showAndroidInfoDialog function could be written in many ways – for example, using ModalBottomSheet:
showModalBottomSheet<void>(
        context: context,
        isDismissible: false,
        shape: RoundedRectangleBorder(
          side: BorderSide(width: 10, color: Colors.transparent),
          borderRadius: BorderRadius.circular(10.0),
        ),
        backgroundColor: Colors.white,
        builder: (ctx) {
          return Container(
            height: 400,
            color: Colors.white,
            child: Center(
              child: Column(
                mainAxisAlignment: MainAxisAlignment.center,
                mainAxisSize: MainAxisSize.min,
                children: <Widget>[
                  Text('Ready to scan', style: TextStyle(fontSize: 30)),
                  SizedBox(height: 30),
                  Container(
                    child: Icon(IconData(0xe4b2, fontFamily: 'MaterialIcons'),
                        size: 70, color: Colors.blue,),
                    decoration: BoxDecoration(
                        border: Border.all(
                          color: Colors.blue,
                          width: 3,
                        ),
                        borderRadius: BorderRadius.all(Radius.circular(70))),
                        padding: EdgeInsets.all(20),
                  ),
                  SizedBox(height: 30),
                  Text(text, style: TextStyle(fontSize: 20)),
                  SizedBox(height: 30),
                  ElevatedButton(
                      child: const Text('Cancel'),
                      onPressed: () async {
                        Navigator.pop(context);
                        await Future.delayed(Duration(seconds: 1));
                        await FlutterNfcKit.finish();
                      })
                ],
              ),
            ),
          );
        });
We could style it any way we like. The important thing to remember here is what happens when the Cancel button is pressed. Its purpose is to close the dialog and cancel the search for the NFC tag. We must not forget about the one-second delay here to avoid triggering the default Android behavior by accident.
That’s basically all we need from the NFC part of the app. What is left to do is to use the selectedZoneId that we got from reading the NFC tag to highlight the desired zone on the office map. We could also manually pick a zone from the map, and it would set it as a global selectedZoneId as well, which we could, in turn, use to write onto the NFC tag.
So, to conclude, this is just a simple example of an app written in order to test the NFC handling with Flutter, but the possibilities of using those nifty little tags are numerous. In this article, a couple of them were mentioned, but there are many more creative ways to avoid repetitive actions and make our lives a tiny bit simpler if we want to.