


 The SNT Editorial team |
| The team is responsible for CMS and related software for Norwegian newspapers: Aftenposten, BT, SA and FVN. |
During the last hack day organized by Schibsted Tech Polska we decided to create an application which would not only be innovative and fun but also useful. We talked with our office administration department to find out what were the business needs of our company, and from many internal demands we chose to automate the business trips process.
The goal was to implement a working application, with work efforts limited to a minimum. To achieve that we had to plan carefully, choose features to be implemented and resign from other ones that were not necessarily needed. We worked in the team of 4 people from the SNT Editorial team: UX designer, front-end developer, back-end developer, and database/back-end developer.
The outcome? The business trip planner application that we created has the following features:
- Create new business trip request
- Accept/decline by manager
- Dashboard
- List of employees currently away
- Export to MS Excel
- E-mail notifications
- Export business trip details to PDF
- Integration with corporate single sign on
Implementation time: 1 hackday + 2.5 additional days after office hours.
Step 1 – Requirement elicitation
To define the scope and the list of features of the application you can use different techniques. It’s a crucial project phase and cannot be underestimated. We used a list of requirements prepared by the project owner – our accountant, who was really interested in moving documents flow from paper to computer. Then we analyzed existing paper documents and the workflow. One or two workshops with brainstorming sessions helped in reaching the final definition and allowed us to write down the list of requirements.
During requirement elicitation it is necessary to describe:
- Actors – who will use the app
- Flow – states and state transitions
- Documents – list of documents you need to serialize with their structure
It’s really important to keep it simple. Adding features is easy at this stage, however, we wanted to have a quick win, deliver quickly and, and enhance the app in the future, if needed.
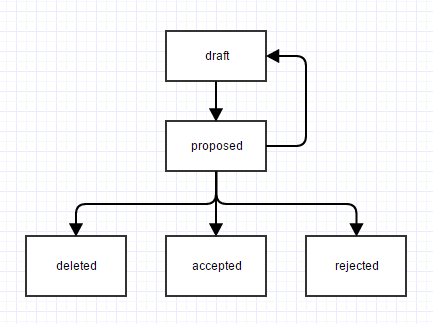
In our case, we simplified the workflow, and from several states and state transitions at the beginning, we ended up with 4 simple states: proposed, accepted, rejected, deleted, with only some transitions allowed. Someone could ask why do we need the “deleted” state, while we can delete the document when it’s no longer needed? Good point, it’s a matter of taste and personally I like to keep all the data, just in case someone deleted the record by accident.
Step 2 – UX design
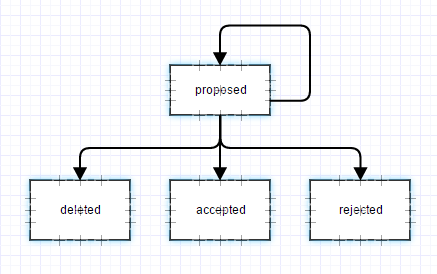
Several things had to be cleared out before the implementation started. Once we had a good overview a simple UX process began. We looked at the actors once again and brainstormed how we could facilitate a good user experience from the perspective of each user, as the app would be equally used by employees, managers and HR department. We discussed various task flows to ensure that the whole process could be easy to understand and clear to each user. After that, simple interface sketches were made. Several online tools can be used here, but paper prototyping is often good enough. During the prototyping phase we decided to simplify the workflow even more and some new ideas came out.
At this point we decided to simplify the workflow:
Step 3 – Integration design
Interfacing with other systems and micro services was another thing that needed to be properly described. And in case of the business trips application it was:
- Corporate single-sign-on system
- E-mail notifications
- Teams structure application being developed by another team at the same time
- Integration with accounting software by exporting Excel files (real excel, not shortcutting with CSV)
For other services developed by a different team, we agreed on what API specification they would use. We could either expose restful HTTP API or use queues. In the Heroku world the RabbitMQ queue system can be used as well. If you are looking for a really good introduction to AWS queues, read this article on the STP blog.
Both HTTP web services and queues have advantages and disadvantages and you have to choose the best option for your application:

Step 4 – Technology stack design
We came to the point when we had to decide what frameworks, languages, databases, and hosting to use. We decided to host the application on Heroku, which is not as powerful as other possible options, but it’s quick and easy to set up. Heroku also has a handful of useful plugins. As we had already done in our several other projects, we decided to divide the app between 2 layers: user interface written in Angular.js, and backoffice API in groovy/grails.
We needed to decide what data storage was the best for us:
- SQL
- NoSQL
- Other (client side, file system, you name it)
- Maybe you don’t need serialization at all?
A good rule at this stage is to store only the data your system or service is processing and gather all other data from the external systems.
The choice between SQL and NoSQL is a huge topic and here is one of the articles briefly covering the subject: SQL vs NoSQL Database Differences Explained with few Example DB. For our purpose, we chose ClearDB SQL.
Step 5 – Implement security
If you write a business application, your users will probably need to login to the system. Again many options are possible here:
- Implement custom user login and password management
- Integrate with public SSO like Facebook or Google
- Integrate with your corporate SSO/app hub system
- Simple HTTP authentication can sometimes be enough
- Maybe you don’t need user login at all?
The first option, writing your own user authentication and authorization mechanism is good in one case: you work on the Internet banking solution. Otherwise, don’t let your users keep yet another password.
If your application uses or provides API that allows for updates or access to non-public data you’ll need to secure it, and it’s even more important when the application is hosted on Heroku. JSON Web Tokens are a good option here.
Step 6 – Continuous Integration or Delivery set up
There are many differences between CI/CD tools. The options are limited when you have to corporate the Github configuration. Travis.io is one of the options in such situation. Heroku pipelines are a simple and easy-to-use tool for deploying the application on the test stage and in the production environments.
Step 7 – Test your app
We had to choose the first audience of our application. The group wasn’t big but was eager to provide feedback. We gave access to our business trips app to a limited group of colleagues who travel a lot, we collected their feedback, implemented some improvements and then opened the application to all employees.
Step 8 – Be ready for change
It’s what agile is about. You can’t assume that your requirement or design is final. When people start to use the application it can be more than certain that you were wrong at some point. You don’t need to implement all the requests of the users but it’s good to be aware of them.
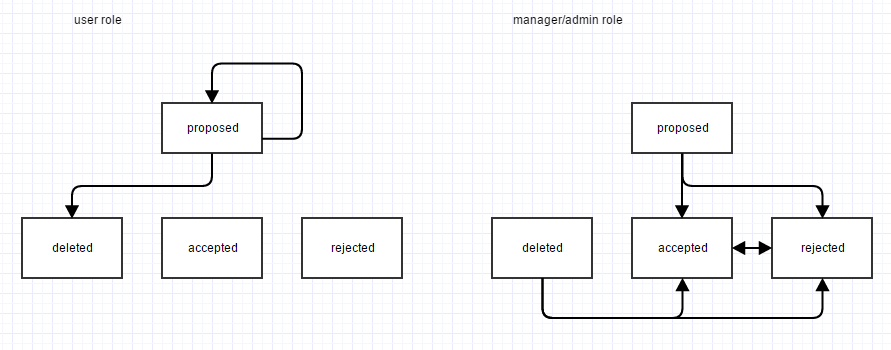
In our application we had to, after several days following the launch, add yet another role: manager, because it had been made clear, that they needed a slightly different view on the data than the administrators. We had to refactor the flow again and finally it looked like this:
Step 9 – monitor your application
The application is not finished before it’s connected to a monitoring software. You should collect logs, configure alerts and tools for monitoring and storing technical and business statistics.
SNT Editorial team:
Tomasz Zakrzewski – team leader
Bartosz Chucherko – UX designer
Dorota Krzos – front-end developer
Katarzyna Włodarska – front-end developer
Przemysław Godyń – back-end developer
Przemysław Kuliga – front-end developer
Marzena Mrugalska – front-end developer (currently on child-care leave)