


In my previous post I described how we used Docker to develop schibsted.pl site. Yet Docker is not only about local development, but it can also be used to easily deploy projects to Production. In the schibsted.pl example we use Docker to run the site in the cloud on AWS Elastic Beanstalk.
The process
Before any change will appear on Production the whole Continuous Delivery process needs to be run. Below, you can see the diagram of the process.
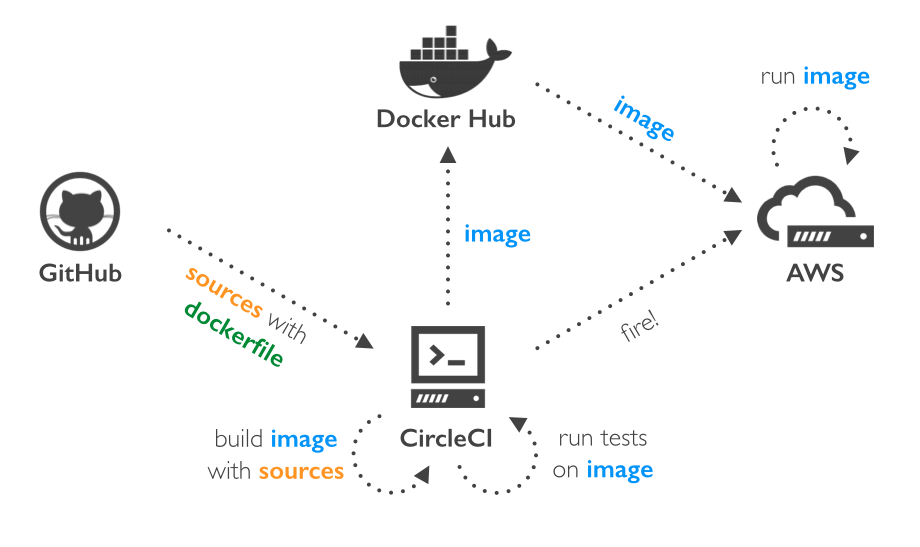
Right after any change is merged and goes to the develop or master branch on GitHub, the process begins. It is conducted by CircleCI – a very cozy web tool for Continuous Integration. It has that one important advantage over other on-demand CI services like Travis – it supports Docker! 🙂
First, CircleCI checks out sources from GitHub, downloads dependencies and builds assets. Next, CircleCI builds our web image (see previous post for reference). We use the same Dockerfile as for development with one simple exception – we permanently add application sources to the image instead of sharing them with the host OS. Thanks to this, our image is a complete bundle of both application source code and its environment.
After the image is built, we start up the container and run automated tests to check whether everything is OK. We use Cucumber.js together with Selenium WebDriver and PhantomJS for functional tests. When all tests are green, we do the deployment. First, our web image is being pushed to the DockerHub and then we tell AWS Elastic Beanstalk to update the environment with the new image. After a while we have the new version running on Production.
CircleCI
Configuring built on CircleCI is fast and easy. The only thing you need to do is to have a repo on GitHub and assign it with CircleCI. CircleCI can configure the build manually on the basis of the files in GitHub. For example, it will install composer dependencies if composer.json file is present in the repo.
In most cases we need to tailor the inbuilt process to suit our needs. It is being done in one simple file called circle.yml. You may want to learn more about preparing circle.yml for running Docker on CircleCI in their documentation.
QA, Stage, Production
In our quality assurance process we use three remote environments. The QA environment is updated after each change is merged with the develop branch – we use it for internal testing. When we are ready with the release we merge it with the master branch and it’s being automatically deployed to the stage environment – this is used for acceptance testing. When everything is fine, then we set version tag on master and it’s being deployed to the Production.
Running Docker on AWS
In Schibsted Tech Polska we widely use cloud solutions for hosting our applications. In the SEALs team, which is responsible for the schibsted.pl site, we use Amazon Web Services. AWS Elastic Beanstalk, precisely.
We don’t have dedicated DevOps engineers in the team. We are developers and we love AWS EBS for it’s ease of use. Uploading to EBS is easy, it stores your application versions on S3, so you can gently rollback when something goes wrong, it gives handy access to logs, comes with preconfigured load balancer and provides efficient user interface.
In April 2014 AWS introduced Docker support on Elastic Beanstalk and since March 2015 they have been supporting multiple Docker containers in a single AWS Elastic Beanstalk environment.
The most important thing when running Docker environment on AWS EBS is to configure Docker containers that will be run on the instance. This is done in simple JSON file called Dockerrun.aws.json. Here is the configuration of a simple LAMP stack – the same as for local development (see previous post for reference).
{
 "AWSEBDockerrunVersion": 2,
 "authentication": {
   "bucket": "schibstedpl",
   "key": "docker/dockercfg"
 },
 "volumes": [
   {
     "name": "data",
     "host": {
       "sourcePath": "/var/data"
     }
   }
 ],
 "containerDefinitions": [
   {
     "name": "db",
     "image": "tutum/mysql",
     "essential": true,
     "memory": 256,
     "mountPoints": [
       {
         "sourceVolume": "data",
         "containerPath": "/var/lib/mysql"
       }
     ]
   },
   {
     "name": "web",
     "image": "stp/schibsted.pl-dist:<TAG>",
     "essential": true,
     "memory": 128,
     "portMappings": [
       {
         "hostPort": 80,
         "containerPort": 80
       }
     ],
     "links": [
       "db"
     ],
     "mountPoints": []
   }
 ]
}
The file includes four sections:
AWSEBDockerrunVersion– the value “2” means simply multicontainer Docker environment,authentication– the location in S3 of a file that contains authentication data for a private DockerHub repository,volumes– definition of shared volumes. In this example we prepare volume for MySQL data folder to keep data between updates,containerDefinitions– an array of container definitions. For each container you define it’s name, image from DockerHub, amount of RAM for the container, network ports mapping, links between containers and mounting points for shared volumes.
Our sample environment consists of two containers:
- A
dbcontainer based ontutum/mysqlimage with 256 MB RAM and sharing MySQL data folder with the host - A
webcontainer based on our own private image with 128 MB RAM, exposing its 80 port and linked to the db container.
As you may see, the content of the file is similar to docker-compose.yml used for local development (see the previous post for reference).
However, running DBMS in the container together with the web container doesn’t seem to be reliable for production usage. This is why for the Stage and Production environments we use AWS RDS instead.
There are also some additional steps you need to follow to start with multiple Docker containers environment, like creating proper IAM policy. It is very well described in the tutorial on AWS docs site.
Further configuration
It’s very probable that you may want to extend your configuration with additional commands, like eg. creating MySQL user with decent access rights. It can be done in .config files placed in .ebextensions folder. See AWS EBS documentation for further reference.
After we deployed number of application versions to the AWS EBS we encountered the issue of running out of disk space. We managed to prevent from it by removing all Docker images and containers from the instance with every update. To do it we prepared a simple docker.config file:
option_settings:
  - namespace: aws:elasticbeanstalk:command
    option_name: Timeout
    value: 1200

commands:
  docker_clean_containers:
    command: docker rm -v $(docker ps -a -q)
    ignoreErrors: true
  docker_clean_images:
    command: docker rmi $(docker images -q)
    ignoreErrors: true
Our experience
Introducing the new schibsted.pl site for the audience went gently, even though we had 151 unique users in the peak hour. The environment automatically scaled the environment on three instances and the load balancer did its job well with separating traffic.
On a daily basis schibsted.pl is viewed 718 times on avarage and with this number the whole Docker configuration is stable and reliable. We haven’t encountered any serious failure since new schibsted.pl site was launched – it means 2 and a half mounths.
What we love about Docker is that you can easily create environment for your web app, run it with isolation from any other environment you have, run it locally and remotely and, what schibsted.pl site proved, can be successfully used on production!